Never fear, I have been busy – I just have nothing to show for it yet.
Even though spring is definitely in the air here, I feel the need for one last winter project. I need a black coat. I have a black coat already but it is hideous and incredibly unflattering. It’s from the Stella McCartney for Target range and I got it on sale, at the time I thought it would be nice to try something different and a bit more ‘fashion’, well let’s just say I’ve learned my lesson there! I have had people stand up for me on the bus thinking I am pregnant and then you have the awkward situation where I don’t deserve the seat, but don’t want to upset a kind person by knocking them back. Therefore, I think it is best for me and the community to have a non-preggers looking black coat.
I bought some beautiful black wool fabric from Tessuti when I was in Sydney a couple of weeks ago. I knew it was narrow so I bought 3m to be sure. Once I got home I started going through my stash of patterns. The main criteria was that it has to go in at the waist. My first pick was Burda 8010 (OOP) altered to be single breasted– except it turned out I’d got the petite size (ok, I know it’s not that hard to lengthen it a bit above and below the waist but remember I am lazy and stubborn). Then Simplicity 4033 (also OOP) – this is promising, I’m thinking View D collar and trims but in the single breasted version. Threads patterns are quite good for me (hideous shift dress failure notwithstanding), I made their trench coat a couple of winters ago and love it. So I got all organised only to find I was about 20cm short on fabric – disaster!
After recovering I then went to Vogue V2538 (again, OOP)– a coat I love and I’ve had the pattern for years and years. Sadly, my former self had cut out a smaller size than I currently wear. I valiantly made a toile but it wasn’t going to work (yes, I know I could alter it but…remember – lazy!). By this stage I was completely over it and went back to knitting and watching the Olympics. Finally I set upon BWOF 09/07/104. I’ve seen several reviews of this coat (and Tany’s leopard version is fab), so I traced off the pattern and was all set to go until my fella said ‘isn’t that pretty much like the coat you’ve already got?’ Well no, it’s much nicer but he was right to notice it’s not exactly fitted at the waist!
So after all this, what did I decide? Back to Simplicity 4033. I rang Tessuti yesterday and bought an extra 0.5m of fabric and today it arrived by express post. I hope this weekend to have some actual sewing to show you.


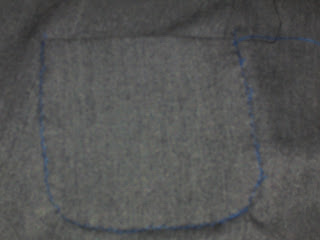

 See, isn't that neat!
 To hide the last little bits of seam allowance you need to stitch down the top corners. I decided to do a little rectangle, but I dare say other techniques would look just as good. I counted the stitches to get the size as regular as possible.
 Other than the pockets, the construction is basic - invisible zip, a couple of darts, the lining is eased to fit the lower edge of the waist facings and a hand sewn hem. And here is the finished skirt.
 It's so nice that even though I've been sewing the best part of thirty years that it still challenges me. I'll probably make this pattern again, both for work and for casual wear and I'll definitely be putting my pockets on by machine in the future!


