Monday, 25 June 2012

Welcome Charlotte!

Our little girl arrived safe and well on the 7th of June.  I didn't quite make it to my scheduled induction, I had been admitted to hospital on the evening of the 6th as they had planned to start the drip at 6am on the 7th.  I ended up going into labour on my own that evening around 10pm and Charlotte was born at 7.31 the following morning.  Everything went quite well, the only issue was everyone kept telling me I couldn't possibly be in labour and therefore couldn't have any pain relief (I was supposed to save it for the 'real thing').  By the time anyone checked and realised that I was, in fact, quite far progressed it was too late for anything stronger than gas and air and I just had to keep going - but by then I was exhausted!  I had always said I didn't want an epidural but in hindsight I totally would have had one if I'd had the option! 


I have not knit or sewn a stitch since I went into labour but now after 2 1/2 weeks I am starting to emerge from the fog of exhaustion and feel the itch again.  While we are not in any kind of routine to speak of, Charlotte's habits are becoming a little more predictable, and I am getting more efficient at all the daily care that a newborn requires.  Mind you I have a lot of help from my fella, for which I am incredibly grateful. So I hope to pick up the knitting needles very soon so I can finish the two WIPs I have, and maybe start working on some projects from my current Crafsty courses.  The sewing may have to wait a little longer as I now have to bring the machines to the dining table to work and the house is still a bit chaotic for that!

I'll leave you with some more pictures of Charlotte.  I think she is the most beautiful baby ever - but I suppose I am biased!

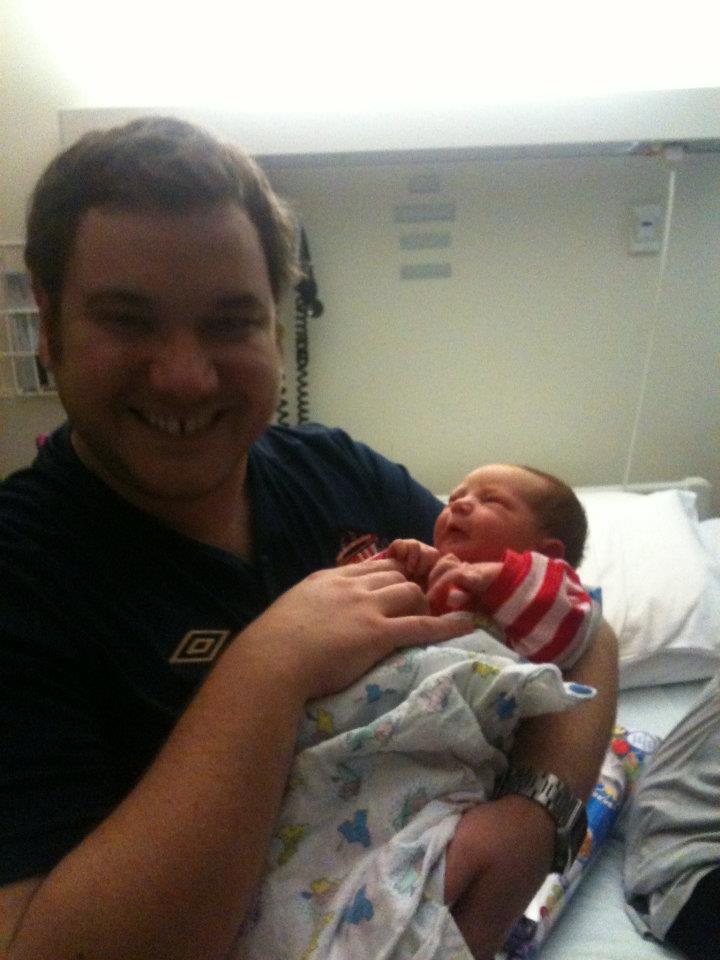
With Daddy at one day old.


One week...

And just this weekend (2 1/2 weeks)...


Isn't she lovely?

Sunday, 3 June 2012

Like waiting for a bus...

The little one is due to make her appearance any day now and I am so excited - it seems like it's passed in the blink of an eye, but yet an eternity at the same time! I am hoping she will arrive on her own schedule, but if not I am booked for an induction on Thursday so only 5 days max to wait.

Today I thought I'd update on my nursery crafting, since that's where I have put most of my effort.  First the nursery curtains...

Now home dec sewing is not something I do a lot of.  It's like alterations and remakes for me - just not my thing.  I really admire people who get pleasure from making cushions and duvets (and curtains) but for me it will always be a chore. Unfortunately I couldn't find any ready made curtains I liked so making them was my only option.

I found this adorable fabric at Spotlight (elephants and giraffes if you can't tell), but by the time I had spent a few months running around and trying to find ready mades, the fabric was sold out at my local store.  Luckily another Spotters still had some so I raced over and bought it from there.  The fabric was pretty expensive ($40 per metre) so I decided to make sill length curtains, but I think they are more practical for a kids room anyway.  I spent ages working out the yardage I would need as I didn't want to have to cut the heads/feet off any of the animals. In the end I decided to buy some of the coordinating floral and use that to make a band at the top and the tabs - problem solved. The curtains are fully lined with blockout (which was my main issue with the ready mades - all the blockout curtains were super formal and anything young-ish was just made from thin polycotton and unlined).  It took me a couple of days to finish them but I must say I am really happy with how they came out. I am not, however, converted to enjoying home dec sewing just yet!

Onto much cuter and more enjoyable projects...

You may have noticed by my previous posts (here and here) that I have fully embraced the creation of softies.  This has been a revelation to me as I would have never thought I would love making toys so much.  Not only are they pretty quick and easy but you get to use up all those odd balls of yarn and bags of stuffing that are lying around cluttering up the place.  I am going to go out on a limb here as well and say that a cute little toy may even be more appreciated that a lovingly handworked blanket for some people - we all know not everyone appreciates how much effort goes into some of these gifts but a sweet little animal always gets a gasp! Here's a rogues gallery for your amusement. The odd man out is the pink teddy on the right hand side - he is my first teddy from when I was a baby!


I previously mentioned I had signed up for the Amigurumi Woodland Animals course on Craftsy - I am so glad I did!The teacher is as adorable as the projects are.  I diligently worked through them all in order.  Even though I am a pretty experienced crocheter I did pick up some new tips along the way, yet I think a determined beginner could certainly handle this course. I particularly liked the bonus lesson on baby-safe eyes.  So simple but I will now use them on all my softie projects.

The first project was the bluebird, which was super simple and took only 2 evenings after work to complete.  I think my fella likes this one best of all, even though there is absolutely nothing to it.  I even fantasised for a while about making several in fine yarn to make a little mobile or thing to string across the pram (I still might do this). I used a double strand of 4ply baby wool and a 5mm hook.

Next was the bear, which was not one of the ones I really loved to start with.  However it came out great and now I think it's fab.  This one is a bit harder, mainly because you have to sew all the pieces together and I struggled to get the nose and ears etc on straight.  I used a 5ply (sportweight) and an 8ply (double knit) in similar rusty colours held together with the same combo of yarn weights in oatmeal for the snout as this turned out a bit thicker than the worsted weight called for in the pattern I used a 6mm hook, no problem at all, the bear just came out a bit bigger that's all.


The third pattern was the one I loved most of all initially but I am slightly disappointed by the result - and I don't know why.  Maybe it's just because all the others came out so darn cute that the deer just doesn't stand out the way I thought it would? Anyway, I still think it's great! This one probably has the most fiddly bits so required a higher level of commitment but it was still super easy and most of the little pieces are quick to make. I used 2 strands of 5ply together for this project and a 5mm hook.


The fourth and final pattern from the course was the raccoon.  This was the only project I had the right weight yarn for in my stash but then I ran out of the grey towards the end.  My fix was just to make the arms stripey.  We don't have raccoons in Australia so I am not sure exactly what they look like (and didn't care enough to look it up), but I didn't think stripey arms would be a massive problem. the trickiest bit for this pattern was getting the eyes to look right and not a bit weird-zombie-raccoon.  My fella and I had some laughs as I tried to get this right! It did take a couple of goes!

Overall I can highly recommend this course.

Wow, this is turning into a marathon post but one more project before I sign off.  After making and loving the giraffe from the Craftsy course (not so) Itty Bitty Giraffe, I signed up to Susan Anderson's other course Wee Ones.  This is a course for seamless knit toys that you work from the top down.  First you make one of three heads, then you pick up stitches and knit the body and arms like a top down sweater.  The legs are added like 'afterthought heels' in sock knitting.  So a great opportunity to learn and practice some intermediate techniques in a small setting.  I made the rabbit and she came out lovely - the only change I made was to substitute chain loops for the pom pom tail - just to be sure it's baby safe.  I think mine might be a bit chubbier than the example as the little top is a bit more cropped than I thought it would be. This is another terrific course and one I can highly recommend.


Right, I think that's enough from me for one Sunday morning I think. Off to walk on some sand and drink some red raspberry leaf tea!

PS. You can be my friend on Craftsy or Ravelry - look me up as JosieE on both!

Sunday, 27 May 2012

Final two me-made maternity outfits

Hello!
Again it has been far too long between posts but never fear, I am still around.  I have been very lucky during my pregnancy not to have experienced any serious health problems, however a wobbly sacroilliac joint and enormously swollen feet have made every day things like sitting upright and on hard chairs fairly (nay, VERY) painful.  So not too much leisure time on the computer or at the sewing machine for me!  Fortunately the semi-reclined position I have been forced to adopt is brilliant for knitting and crochet so I have still been able to be creative.

So what has happened since I last posted? I finished work (which has relieved the SI joint pain a lot!), the weather has finally cooled after yet another record hot summer (so at least I can get socks on now, if not shoes!), I had another birthday (very quiet this year) and have been madly trying to pack all my sewing/crafting kit into one corner of the room that will from now on be the nursery - I am just about there. The baby is less than 2 weeks away and the fella and I are beside ourselves with excitement.

So here, belatedly, are my final two me-made maternity outfits. In these photos I am 28 weeks, and I'm 38 weeks now so that's how far behind on things I am!

This top is another non-maternity garment that I've been able to get a lot of wear out of. It's the cool, calm and cowl top from Hot Patterns, made without the hip band.  It is blogged here. The skirt is the same simple a-line pattern with the Kwik Sew pants yoke spliced on I used for the grey skirt blogged here , and also a denim version that I haven't blogged about.

Apologies for the washed out photo here, I can't tell you how hot our summer was, and how the heat knocked me around - even more than usual.  I love Autumn and Spring, so am in my element now! 

This top is from a Kwik Sew maternity top pattern, K3487.  Kwik Sew patterns are pretty expensive (or were until BMV started selling them) so I had intended to use this a lot, but alas I only made this one version in the end.  I narrowed the upper back neck and added a CB seam so I could shorten the back above the waist as well (usual alterations for me).  I didn't do an FBA, but I should have as the empire seam rides up and the neckline is a smidge open but it's not a deal breaker.  The top has a coffin back so instead of making the belt as instructed and sewing it into the side seams, I made a separate tube and much longer so it wraps around my body twice and breaks the back piece as if the empire seam went all around.  Of course it would have been easy to add an empire seam on the back - I just couldn't be bothered.  This is a nice pattern and definitely one worth adding to the maternity arsenal!

The pants are another Kwik Sew pattern K3324.  I used the stretchy yoke several times on skirts but this is the only pair of pants I made.  I altered the shape of the legs (using my Hot Patterns Weekender Jean Jeanius Trouser Jeans pattern) since tapered pants are never going to do me any favours, pregnant or no! There is not much to say here.  The pattern is pretty simple and the only alteration I made was to lengthen the back crotch (again, a usual alteration for me).  The fit is by no means perfect but they are super comfortable and I only wear them with tunic tops anyway.

So that's pretty much it for my maternity clothes.  I still have to update on numerous baby projects, and will try to do that soon.  We are counting the days now (12 or so to go!). One benefit to being classed as 'high risk' is they won't let me go too late so I only have to be patient for a little while longer.

Oh, before I forget, I got a lovely comment from Cass a while ago and am only responding now.  Cass, thanks for your kind wishes and sharing your experience.  To answer your question about the ripple stitch I used for my millefoglie scarf, I believe the stitch is also called 'old shale' or something like that. I can't remember exactly what I did but in general it would be something like this:

Multiple of 12 sts and 4 rows.
1: Knit
2: Purl
3: k2tog 3 times, yo k1 6 times, k2tog 3 times. Repeat to end (I would have done 3 repeats).
4: Purl (if you want a garter ridge) or Knit (if you want stocking stitch throughout).

I hope this helps!

Friday, 16 March 2012

Harriet the Hippo, times two

I previously mentioned that I was inspired to take the (not so) itty bitty giraffe Craftsy course by Rebecca Danger's ‘Harriet the Hippo’ pattern from the Fall 2011 Knit Simple magazine. Buoyed by my giraffe success (if I do say so myself!) I did move on to making Harriet as well (and also signed up for Susan Anderson’s other Craftsy course – Wee Ones). Here is the first version:


There were a lot of similarities between the two projects and I incorporated some of my giraffe learnings into the hippo project. For instance I stuffed as I went, rather than leaving it to the end and I embroidered the face instead of using safety eyes. The only additional skill that this project used was kitchener stitch – which to be honest isn’t that hard.

Again, I used stash yarn. You may recognise it from my mitred baby blanket project.

I found I needed to really work the stuffing to get a nice fat tummy and good shape. Fortunately this was covered thoroughly in the craftsy course so it wasn’t daunting at all.

This is another success – such a cute project and really quick and easy to work.

My second version is a gift for my friend’s new niece, all the way in New Zealand. I offered to whip up a second hippo as a pressie and in a flash of inspiration decide to try my hand at converting the design to a ballet dancing hippo. You can see this is yet more destashing in action – using leftovers from my giraffe  project. Hurrah, it arrived in Dunedin two days before my friend’s sister went into labour so just in the nick of time!

I worked the skirt separately and worked the body in a ‘leotard’ pattern then knit the skirt onto the body at the approximately right level. I wrote a little tutorial on my ravelry page if anyone is interested in making the same modification.


If anyone is interested but hasn’t tried making knitted soft toys I highly recommend it. They make great gifts, are quick and easy, and aside from stuffing can usually be made from stash (or at least don’t require more than a ball or two of yarn). As a bonus, if you are wanting to post internationally they weigh next to nothing!

Up next, my last couple of work outfits and some crochet/knit baby clothes.

Monday, 5 March 2012

What I'm wearing to work these days - Part 1

I am aware I haven’t done a sewing post since Christmas so here is my weak attempt to catch up. To be honest I have had one wadder after the next, which is really discouraging so I am ‘making do’ a lot of the time, and with only 8 weeks left at work I will probably continue to do so except for a couple of extra tops.


When the fella and I started trying for a baby I instantly got caught up in the fabulous maternity wardrobe I would have. As it turned out I had 18 months to plan but at the end of the day it all went to sh*t because of morning sickness, tiredness and bad pattern/fabric choices. To take the positive lesson here – I now understand why most maternity clothes (tops especially) are made from stretch fabrics. Wovens have to be made to accommodate the biggest bump and so tend to flap around like fairly unflattering tents for most of your pregnancy. The other key lesson is that styles that don’t suit you when you are not pregnant (ie. big tops and skinny pants for me) will continue to not suit you when you are!

Of course the other issue is fitting an ever changing body. I haven’t had too much trouble with my tummy, my main issue has been the bust area. Not only has it grown – necessitating a fairly substantial FBA, but having to wear non-wired underwear means that my bust point is much lower than usual, and this has taken me a while to realise/compensate for. Of course, this is another reason that knit tops win over woven as they are a lot more forgiving of fit issues.

So here is a run-down of what I have been wearing to work. I don’t suppose full reviews are necessary, but I will give as much info as I can. Please forgive the dying/dead back yard as we have had yet another record breaking hot summer and it's just too hot to care right now!

I am 25 weeks in these picture - yeah I know, huge right?


This dress is made from Simplicity 2219 and the only alterations were an fba and to pivot the top edge of the front skirt by a couple of inches to provide belly room. I love how this dress came out – the interfacing in the bodice give you the best of both worlds with a more tailored look in the bodice without losing the stretchy comfort in the rest of the dress. It came together very easily and is super comfortable.

I had originally planned to make the sleeveless maxi-dress version too but it quickly became clear to me that look is not bra-friendly so if you are going to do the sleeveless style perhaps make sure you a) can go bra-less b) build in support somehow or c) a racer back bra might work.

Would I make it again? Possibly – it would be a good mum-on-the-go dress that would hide any extra midriff fluff quite nicely, although I am not sure if people wouldn’t see me and think a second was on the way!


I made these pants early on, when I busted out of all my regular pants by about 9 weeks. The pattern is a self-drafted mish mash of a Mrs Stylebook pattern, leg shaping form existing pants I liked and my own idea of what a maternity panel might look like without ever having seen one. They do the job but they are certainly not my finest work.

The top is a pre-existing one, blogged here.

You know it’s amazing what photos can show you. I had thought this was a pretty good look but now I see it makes my legs look very stumpy! If I cared enough I would slim the trouser legs a bit and possibly shorten the top an inch or so. But I really don’t care that much – these pants will probably go in the bin as soon as I finish work!

I have not previously blogged this top although I made it sometime ago now. I cut it out thinking it would get me through the early weeks when I would just need slightly looser clothes, but it has turned into a real workhorse. The pattern is Butterick 5495 and from memory it was one of Pattern Review’s top 10 patterns of 2010, or maybe 2009. I simply added a little width to the side seams on the lower front and it worked out great. I can see myself making the long sleeved version of this for winter and possibly another short sleeved version – I have pretty much worn this one to death and am a bit sick of it to be honest!

For the skirt I use an old faithful A-line skirt pattern and spliced on the yoke from a Kwik Sew maternity pants pattern which I'll talk about more next time.

I have a couple more outfits to show and will try to get pictures this week, but in a nutshell this is how I am scraping by at the moment. A bit pathetic really, but there doesn't seem to be a point to having a huge number of maternity clothes.
 
Toe up socks update: I have finished the course and thoroughly enjoyed it however the one sock I have made is a wadder.  As my fella said - how many of those cute giraffes could you have made in the time it took you to make that one ugly sock? Loads is the answer! So the socks are hibernating for the time being! No worries though, I have plenty of knitting and crochet projects to keep me going.

Sunday, 19 February 2012

One of my goals for this year was to learn new skills. There are not many opportunities for an experienced sewer/knitter to upskill here in Perth, except through books and magazines – which are great, but sometimes it’s nice to feel that personal contact. This is where Craftsy has been a brilliant resource for me. I have signed up for a number of courses so far and have not been disappointed yet.


My first course was the (not so) Itty Bitty Giraffe by Susan B Anderson.

I have wanted to make a ‘softie’ after seeing the pattern for Rebecca Danger’s adorable hippo in the Fall 2011 Knit Simple. The only problem was I didn’t have the confidence to just go for it. I am something of a planner so I had to know the details going in. How does the stuffing not come out? What do you do about the eyes? If you substitute yarn, is the idea to knit at a tighter gauge? If so, how tight? How hard do you stuff the thing (given sewn items are normally stuffed rock hard)????? Argh, so many questions!

I thought doing the workshop would help me answer all these questions and more, and it did. As a bonus I ended up with a super cute toy for the baby, which I am really pleased with AND I feel like I expanded my skillset. Not only that, but the cream yarn I used for the body was from stash – another of my goals for the year!

This was not a difficult project and it was made easier by the video tutorials, which I thoroughly enjoyed. The only special skills needed are working with double pointed needles – but if you are a beginner it is explained well. For me it was about building my confidence in the more artistic aspects of the project – where to place the spots, how do you put the head on right and how do you stuff the toy? I worked it up over my Christmas/New Year holiday and it only took a few days, I would absolutely make this project again – much quicker than a blanket.

Susan Anderson also has a lovely manner and each video felt very personal.

If you are interested in the technical details of the project and the modifications I made then visit my Ravelry page.

So what other new skills am I learning? I am currently working through the knit original toe up socks class(very challenging but enjoyable – and more stash used). In the queue are the lace shawls course, Susan Anderson’s other course – Wee Ones, the free Block of the Month series, fit your knits and I am also keen to do the Couture Dress and reverse engineered jeans course. I’m not sure quite how I will get through all this but it will be fun trying.

Friday, 10 February 2012

A tale of two blankets

Crikey, where did a whole month go - again?

As soon as I saw the Spring 2005 edition of Interweave Knits I knew that if I was ever lucky enough to have a baby of my own I would make them the Bear Claw blanket. So as soon as I found out I was pregnant I went ahead and ordered the yarn. I chose 4ply Luxury from the Bendigo Woollen Mills. I love this yarn, it’s soft and even, a joy to knit with and as a bonus is machine washable. My only gripe is the colours aren’t particularly modern. The neutrals are nice but the other colours just don’t stack up against some of the boutique yarn companies (a bit 'old lady' if you like). I wanted soft relaxing colours for this blanket so I went with cream, wild barley, ghost and stone.

In due course the yarns arrived and the colours were as lovely as I imagined, soft, modern, gender neutral. I couldn’t wait to get started. I knew this was a major project but was unperturbed. This is how far I got…


It wasn’t the millions of ends to darn that put me off, I was prepared for them. What did me in was the tediousness of the knitting – which I didn’t expect. I thought this would be perfect for my process oriented mind but in fact it was just a bloody fiddle. And frankly, my lovely modern colour scheme just didn’t work for this project. Instead of clean and contemporary the look I was getting was a bit country cottage for my taste. Maybe it was because by this point morning sickness had struck me full force but I couldn’t bear to persevere and I abandoned ship.

I decided instead to go back to basics. Cerys is about as simple a blanket pattern as you can get, anyone with in-the-round experience could do it and, in fact, it would probably be the perfect project for someone wanting to learn how to work in the round (although the centre is a bit of a fiddle). I modified the design slightly so my round begins in the middle of one side rather than at the corner, and I made up my own stripe pattern. To minimise the ‘jog’ when changing colours I knit the first round with the new colour then on the second round I worked the first stitch into the round below. You get a slightly elongated stitch which smooths the join a bit. I searched around for ‘jogless’ techniques but this is by far the simplest in my mind.

This was the perfect morning sickness project, even when I couldn’t do anything much I could lounge in front of the TV and knit mindless rounds, only having to remember to change colours. The project grew quickly too and once I started to feel better it positively flew off the needles.

I think about 75 – 80cm square is a pretty good sized baby blanket as it works in a pram or capsule and can also be used as a receiving blanket (is that what you call a blanket you carry a baby around in???). I just knit to a pleasing part of the stripe pattern at around that size and then worked the hem. I worked an eyelet round and then 6 rounds reversing the mitre for the hem. I think I could have worked the last stripe a little wider as it looks a bit stingy but it’s not too bad really.

The finishing took ages! I cast off the usual way but then thought it might be a pain to block it with a tight edge, so I undid the cast-off and worked a sewn cast off instead. Next I blocked it (rather informally by washing on a gentle cycle in the machine and spreading it flat and square to dry – no pins involved), then finally sewed down the hem. it is more square than it looks in the picture but I am okay with it not being perfect.


Project details are here if you are interested.

Overall I am super happy with the result. As to the baby bear claw? Yes I would try again maybe, but I think stronger colours are needed and I would possibly go for a thicker yarn and bigger needles to make a modified version!

Saturday, 14 January 2012

Blogiversary the fourth

So it's my 4th Blogiversary today!


I admit I don't really feel entitled to celebrate too much since I took a six month break this year but it is a milestone and an opportunity to look both back and forwards nonetheless.

I have not been as productive as usual, but I have still made quite a lot. I focussed on knitting more than sewing and ended up completing 12 knitting/crochet projects (some of which are unblogged) and 13 sewing projects (again, some unblogged). this is compared with 21 sewing and 9 knitting/crochet projects last year. Still, I did my best and am reasonably happy with what I achieved.

As to my goals for the coming year, I don't think it will be possible to set specific targets as I have no way of knowing what is to come. However, I hate the thought of being completely undisciplined so here are my thoughts:

 
  1. Destash. This is a common theme for both myself and many others every year. This year is different for me since what is currently my sewing room will become the nursery until we are able to move house. Therefore I HAVE to use as much as possible of my stash or else it will have to be got rid of or stored (not at home since there is no room). Fabric and yarn alike have to go before June!
  2. Make more than I buy for myself. This is a no-brainer, I really only buy t-shirts, underwear and the occasional other garment anyway. For the past year I have been making do with old stuff and quick fixes but I can't wear any of that now so my need is great!
  3. Focus on presentable casuals. Obviously my lifestyle is going to change a lot. I only have 15 weeks left of work and when you remove public holidays that comes down to only 70 working days (not that I am counting :) ). Much more of my time than ever before will be in 'at home' clothes and I want to be comfortable and washable but presentable. My current 'at home' uniform of pj's/sweats (not outside the house of course) will not cut it! Likewise, tailored suitings and silk tops are not going to be practical either.
  4. Make more than I buy for the baby. Another relatively easy one, with time being the only issue. I have plenty of baby yarn in stash so no problem there. Thanks to my Mum and sister this child already has a wardrobe to rival Harper Beckham so there is no need for me to worry about clothes too much but I would like to make as many toys, blankets and soft furnishings as possible.
  5. Learn some new things. I have started this by signing up for a couple of Craftsy workshops, and I may yet use the felting kit I bought several years ago to make a cover for my new Kindle.
  6. Blog more regularly.
 
Even without targets I still have a to do list for the next few months:

 
For me:
  • 1 skirt and 2 pairs of pants for work (fairly quick when you make them with a knit yoke!)
  • 5 or so work tops (mainly knit so will accommodate the belly)
  • wide leg pants for around the house (again, with a knit yoke so I can wear them before the baby and for the 10 days or so after the birth until I get my figure back - lol)
  • 2 Warm cardigans

 
For the wee one:

So let's see how we go...
 
Thanks again to those who have stuck with me while my blogging has been so sporadic and for all the kind wishes on my pregnancy. 

Thursday, 29 December 2011

Christmas dress 2011

Hi everyone.

Thanks for the congratulations on my news. My fella and I are so happy and excited, especially after the struggles we have had trying to accomplish what so many people manage to do by accident! The past 18 months have been incredibly challenging and when I look back to this time last year - we had just found out we would never conceive without intervention and I was trying to get my head around having to give myself injections (when I would have fillings at the dentist without anaesthetic just to avoid a needle!) - I can't believe how everything has worked out. I know we beat the odds big time and I will never stop being grateful for that. I dare say next year will be very different again, with a whole new set of challenges and I can't wait!

So, despite weighing exactly what I weighed 16 weeks ago I have gone up by 2 bra sizes and sprouted a pretty obvious belly already.  Something to do with my not exactly having abs of steel to start with I suppose. Regardless, I have found myself with an extreme shortage of clothes, including a party/Christmas dress. Enter Patrones Easy (7) model 31 - this magazine also has some maternity patterns so you may see more from this issue yet.

From the magazine
The fabric is china silk in white with a black, grey and bronze border print, from stash and lined in poplin (bodice) and lawn (skirt) also from stash.

Ugh, sorry for the squinty face

Back view, with breeze!
I made a few modifications to the pattern:
  1. Moved the zip to centre back so I could somewhat centre the border design.
  2. Cut a size 42 bodice and band, and 48 skirt, then just pleated the excess into the band.
  3. Added about 1cm to the length of the front bodice.
  4. Switched the front and back necklines - I think this could be an error on the pattern sheet, as the front is higher than the back, and much higher than the picture if you use the pattern as is.
  5. Narrowed the band by about half or maybe more, and omitted the ribbon and casing. You can see the band still wrinkled with wear but I don't suppose there is much that can be done about that (it's not wonky in real life I promise).

If I was to make this again I would investigate the armhole shaping as it feels a bit wide in the front and narrow in the back - which is quite possibly caused by my arms rolling forward. It makes driving a little uncomfortable but a little scooping out of the curve should fix it. Also the skirt hem comes up a touch in the front, which I knew would happen but I didn't have time to get around compensating for it - I think it is passable.

As to construction I underlined the bodice and band pieces with silk organza (using the lining pattern for the front and mounting the gathered front bodice onto it) and pleated the skirt randomly instead of gathering.

Considering I had to pull this together quickly (I traced, toilled and cut on the previous Sunday, worked an hour or so most evenings the week before Christmas and finished it 10 minutes before I needed to put it on for lunch on Christmas Eve) I am happy with how it turned out and the minor fit niggles are not too bad considering. It was comfortable to eat a big meal on a fairly hot day and I think it flatters the bump without entirely obscuring it.


I am on holidays until the 9th of January and desperately need both work and casual clothes, so with luck I will be able to churn out a few basic before going back to work.  I also have a couple of knitting projects on the go and a backlog of a few garments still to post (waiting to photograph!) so while I have the free time I will attempt to update my blog a bit more regularly.

I hope everyone had a safe and merry Christmas and are looking forward to the new year as much as me!

Monday, 19 December 2011

A very special knitting project

This blanket is very special. If you are not interested in the knitting details then you can skip to the end to find out exactly what is so special about it.


The pattern is the Fertility blanket from Stitch n Bitch Superstar Knitting, but I have just discovered you can now get it for free. I have said it before and I will say it again, this book is an excellent resource for anyone who wants to move beyond the basics, or even if you have been knitting for ages (like me) but want to increase your repertoire of techniques. For me, this book was worth every cent and I refer to it often. Plus a lot of the patterns are things I would make (when I get around to it!).

The pattern is tricky at first (as any lace pattern is), but once you do a couple of repeats you can look to your completed work to figure out where you are. I always keep a tally of my rows anyway, but I am a little obsessive like that. It grows remarkably quickly and it’s very rewarding to see it progress at a good rate. I liked that the bobbles are worked over multiple rows so they nestle in rather than single row bobbles, which I find tend to dangle off your work a bit.
This photo is pre-blocking, but you get the idea
The yarn is a mystery ‘organic wool’ that I got in a pack lot from Jo Sharp for $25. It’s probably a heavy double knit or light aran weight and I knit it on the size needles specified in the pattern, which resulted in a fairly light and drapey blanket, but not too loose. I think if I were knitting a jumper with it I would use a 4.5mm needle – but I haven’t tried that so don’t quote me. I used 5½ of the ten balls. I worried it might be a bit fluffy for a baby blanket but after blocking a lot of the loose fibres came away and now it is lovely and soft. The colour is a beautiful soft pistachio green.

When I finished the blanket I wasn’t sure if I would block it as I loved the texture of the stitch, but I figured that is would have to be washed anyway so I did block it in the end. Boy, am I glad I did! The stitch really opened up and, as much as I loved it before, I think it is better now.
Unblocked
Blocked

I cast this on when I started my first round of IVF back in February, to keep my mind off things and to give me something productive to focus on instead of going crazy with the stress. I thought the name of it might hold some influence and I only worked on it when I was feeling positive so that the whole blanket holds pleasant memories for me. Sadly that round didn’t work ... nor did the next one ... or the one after that. However I am happy to report that the next one did and I am now 15 weeks pregnant. So this very special blanket will be the very first thing I ever made for my own baby, before she was even conceived.

And we just found out we are having a girl, so I get to keep the wildly impractical Jo Sharp granny blanket too! Happy days!

Tuesday, 13 December 2011

Colette Ginger in denim

Well I jumped on the ginger bandwagon.  There are so many wonderful versions out there, and A-line is my go to skirt shape, so how could I not.  My version is in a fairly heavy indigo denim with topstitching in a sort-of parchment colour. I used standard thread for the topstitching but used the forward-back-forward stitch (triple stitch?) to give it some oomph. I went for the shaped waistband which appealed to me as it looks like a heart. The waistband is lined in quilting cotton.


I made no alterations to the pattern and cut a straight size 12 (I think).  During construction I realised my ridiculously high waist would make the waistband hit the bottom of my bra so I reduced the height by about 1.5cm. I think in future iterations I would lower the top of the skirt and cut a longer waistband so it sits lower on me, not at my natural waist (basically at the bottom of my ribcage) but closer to where I would like my natural waist to be!

Because the denim is very stiff I went with a metal zip instead of the recommended invisible zip which worked great IMO (except you can't see it in this picture so will have to take my word for it).

I love how this skirt came out, it is very simple to make and a lovely shape that seems to be pretty flattering on everyone (and would be on me if I altered it as discussed above).

Unfortunately some medication I have been taking has caused me to lay down some extra weight on my tummy and waist.  This is new for me since ordinarily any weight I gained would go straight to my behind and from the waist up would remain more or less the same.  So that means I can't even wear this skirt right now.  But rather than donate it I am going to hang it in the wardrobe for the day when I can get into it again.  Then I bet I will wear it all the time!