Sunday, 25 January 2009

It's Made From Grass

Yes I have made a cardigan out of grass, bamboo being a type of grass after all. The yarn is Cleckheaton 100% Bamboo and the pattern is from this Cleckheaton book. I made the second size (small - finished measurement 85cm).


This is a fairly easy knit but be warned it involves many, many rows of boring stocking stitch. The yarn is 4-ply weight and the needles used are 3.25mm. As the body and yoke are knit in one piece there are a lot of stitches too. This is definitely a project to work on while watching TV or DVDs. The Sopranos seasons 4, 5 and 6 got me a long way through this cardigan!

Normally I am not much of a blocker, I usually figure normal washing and gravity will take care of any 'quirks' of tension. Since I am trying to be better at doing things the right way I decided to block this by soaking it in lukewarm soapy water and patting it to shape on a towel and leaving it to dry.

Thank goodness I decided to do this as look what happened to the water the second I got the cardigan wet:

And this was the rinse water!

The cardigan has amazing drape and feels beautiful am I am really pleased with it. The only thing I would do differently would be to add some knitting-in elastic to the neckband - the fantastic drape comes with stretch and the neckline has grown a lot already. I'm not sure how I will deal with this.


The lace edging is only 7 rows at the beginning of the body and sleeves and it's really simple, as I said before getting bored is the only risk in this project. It is, however definitely worth persevering.


What I like most about this cardigan is that it means I can get away with wearing an ordinary tank top to work!

Monday, 19 January 2009

McCall's M5597 - The Almost Perfect Skirt

My black A-line skirt needed to be retired so I decided to replace it with a black pencil skirt. I really can't believe I've avoided pencil skirts for so long, they are actually quite flattering on a barge-arse! I used M5597, which modestly refers to itself as 'the perfect suit'. Well I don't know about the rest of the garments, but if the skirt is anything to go by, it's pretty darn good IMHO.
Hmm, I really wanted to get my new shoes into the shot (half price at Nine West), sadly my photographer didn't share my priorities. Conscious that I'm luck to have a photographer on hand at all, I didn't push it
This is the back view and it shows the only design flaw in my belief. I much prefer a vent at the back to a plain split (I mean I don't think the back of anyone's knees are attractive!). I didn't change it as I wanted to see if it would look okay, it does - just not perfect.

Here is an embarrassing insight into my life that illustrates why I like vents. While I understand (but can't comprehend) how FREEZING it is in the northern hemisphere, back here has been the hottest January on record. On Friday it was just shy of 42 degrees (that's around 108 to you fahrenheit people). I have taken to wearing long-line shorts under my skirts for comfort when it's really hot (like shapewear but not so tight). Well, let's just say I regretted that choice when I wore this skirt to work the other day. The shorts don't show below the skirt normally, but when walking they do peek through the split. Not to mention that was the day I got my stiletto stuck in the pavement and pulled off my shoe TWICE! And I've never even done that once before. I am so uncool! Moving right along...
Here's the side view.

This pattern is well drafted, goes together easily and fits really well. It doesn't have a lining which is just weird, so I added one, and I used an invisible zip. I felt there was a touch too much ease in the skirt piece so it's a little ripple-y at the yoke seam, but I think that's because I used a stretch woven, if I'd used wool it probably would have steamed out fine. You might was to check this for yourself if you choose to make one.

PS. Sew4fun, I WISH I was Hugh Jackman's dresser! No, I dressed a couple of the guys in the chorus (both really nice guys), but Hugh was lovely, always friendly and said hello, and never complained when starstruck crew members wanted their photo taken with him. *sigh*

Wednesday, 14 January 2009

Happy Blogoversary to Me

So it’s my blogoversary...

When I first stumbled on fashion and sewing (and fashion sewing) blogs and sites like Pattern Review about 18 months ago (I can’t even remember how it happened now) it was as if a whole world opened up. Even though I have friends and family who are interested in fashion and sewing, I just love reading about people’s projects from all over the world. I really thought long and hard before starting my own blog as a) I wasn’t sure what I had to contribute to the sewing community and b) I wasn’t sure I had the dedication it would take. So here I am, a whole year later, having managed 57 posts which is a reasonable rate IMHO, I have had times where life got in the way or my mojo went on holiday and other times where I have been super-productive. But overall I have achieved my aims in starting my blog, namely to improve my standards and stop being lazy, and to stay motivated to sew more of my own clothes.

To celebrate I am not going to do an annual retrospective, but I am going to follow Lindsay T’s lead and give you my sewing back story…

One of my earliest and most favourite Christmas memories is the sounds I always heard on Christmas Eve after my sister and I had gone to bed. The wonderful, deep slicing sound of shears against the kitchen table (I still love that sound) and the whirring and rattling of the sewing machine. I didn’t know what exactly those sounds were but I knew they meant that on Christmas morning I would wake up and my sister and I would have a new dress each, made with love by our Mum. They were always identical except the colour and every year I loved and looked forward to my Christmas dress. I never felt that home made was ‘less than’ – I’ve always believed (even at that young age) that love and craftsmanship counted for more than the label on the inside.

When I was about 7 or 8 I started dance classes, which meant dancing costumes and my Mum patiently made those for me too.

The girl in the shamrock dress is my sister but I love the costume-I really wished it was mine. Our concert that year had an international theme - I scored the hula! I am probably about 7 or 8 here.

This lovely Spanish number is made from poplin. And I LOVED this jumpsuit (you can't tell from the picture but it's shorts). Mum took the tinsel off after the concert and I wore it everywhere until I grew out of it!

Thank goodness I was not talented at dance and didn’t carry on past my early teens, it must have been such a pressure on Mum as she always worked full time and, after I was 13, she was a single mother. I used to watch her sewing on sequins and wish that I could help but she would never let me. All the nagging must have worked though because she started to teach me to sew – by hand. She helped me cut out an evening dress for my Sindy doll – cobalt blue voile with white ribbon for the straps and belt. My reward for making this dress entirely by hand was my first sewing machine.

Ah, my first machine! It was a Holly Hobby design and had a crank that fitted into the fly wheel so I could wind by hand at first, then it had a little foot peddle that I moved onto when I was confident enough. It didn’t do zig zag or anything but I loved it, not to mention I had the best dressed dolls in the neighbourhood!

At about 15 I started making my own clothes and let me tell you there were some shockers! I didn’t really use patterns then but just felt my way through it. I believe this has helped me later in life with pattern drafting and fitting as I developed a sense of how a flat piece of fabric can be made to cover a curved surface.

Here's my year 10 formal dress (I'm 15) check out the fingerless gloves - I crocheted them! And yes, I did like 'A Flock of Seagulls'!


And next is my year 12 formal dress, it was 1986 and I was channeling Kylie Minogue with the hairdo (I should be so lucky!). I don't know what was going on with the dress - all I can remember is that I thought it ROCKED.
After year 11 I applied and was accepted to fashion design at the local technical college but I was convinced to complete high school as I had good grades (yes, I know, it was good advice!). I ended up studying psychology at university and after a round about journey ended up in market research.


For some reason I didn't do much sewing at this stage in my life. I did a lot of cross stitch, embroidery and bobbin lacemaking. On a trip to the UK in 2001 I even did a short course at the Royal School of Needlework.


After 61/2 years as a consultant I was burned out and completely miserable so I decided to pack it in and finally pursue my dreams, studying costume at WAAPA. I had a brilliant 3 years of study (at least I was sewing again even if it was for other people more than myself) and then 2 years scraping a living working as a theatre dresser, in a fancy dress shop, at a bridal design studio and in a fabric shop (where I also started teaching).

Working as a dresser on 'Boy From Oz'. Best. Job. Ever.
Sadly part time and casual work isn't enough for a single girl on the wrong side of 35 with a mortgage so when an opportunity came up to go back to market research I took it.

So that's where I am now. Constantly battling to maintain my work-life balance as I know all too well the consequences of letting that slide, but nevertheless happy that for the first time in five years I don't have to choose between paying bills and eating (or, more realistically, getting in more debt!). I'm also happy to have an outlet for my creative side, I have discovered that career wear really is my niche and it's great to be able to afford nice fabrics to work with. I'm also happy that I did decide to start this blog a year ago. I am chuffed to bits that anyone stops by and over the moon when I get comments from people. Sometimes when I feel work start to get on top of me I read my favourite blogs and I am reminded that so many of you have the same issues (namely you'd rather sew than just about anything else!), I just love that sense of connection.

So welcome to any new readers and thanks to any regulars for sticking with me. I hope you enjoy my little walk down memory lane. Feel free to chuckle at my shameful photos (I know I did!) but please don't judge - I am a victim of the times!

Thursday, 8 January 2009

BWOF 07-2008-108 Tunic Part 2

Today I'll show you how I face a sleeveless top without hand sewing. It's not that I am against hand sewing - in fact I really enjoy it but I find this method give a really high quality result without bulky seam allowances getting in the way. I learned it when I was working in bridal, where we used it on halter tops and sleeveless bodices. This tunic isn't strictly sleeveless so it's a bit easier than normal (you would usually have to sew the armhole in two stages) but the principle is the same so you might like to try it.

OK. So I have finished the lower armhole and joined the yokes to the rest of the tunic. I have also sewn the shoulder seams in the yoke facings.

The first thing to do is to sew the neck seam, understitch it on the facing side and then clip and press (this is the order that works best for me - and it give the smoothest results).

This next part involves a little maths. If you use seam allowances other than 1.5cm (5/8") then you will need to work this out for yourself. My little brain took ages to figure it out for 1.5cm!

Trim 0.5cm off the armhole edge of your facings, this will ensure that the facing rolls nicely to the inside of the top.


Next, open the top out so it looks like the picture below. The shoulder seams are running horizontally. Forgive my photo, I don't have photo editing software so I had to do this in crappy old paint.


Get hold of the armhole ends of the shoulder seams, facing in your left hand and yoke in your right. Bring your left hand around behind the top and match the seam ends in your right hand then pin them together. Don't think about this too much - it will hurt your brain. The top will resemble a fortune cookie at this point.
Work your way out from the seam until the entire facing edge is pinned to the yoke edge. You will need to wiggle and adjust as you go but it can be done. If the entire armhole is faced, you'll need to do this in two goes.
Sew in a 1cm seam (not 1.5cm because of what you trimmed off earlier). Your seam will not match up to the finished edge of the lower armhole but when you turn everything through to the right side you will find the yoke and facing roll nicely to the inside and look really smooth and neat. You can understitch this seam too. It is tricky but worth the patience. This is the finished armhole from the inside.
The next stage is to sew down the facings to the yoke seams on the inside. You can turn under the edge and stitch in the ditch, which is what I planned to do, but in the end I decided to hand sew this part. It really didn't take long and gave a really nice finish.


Here is the finished top. I made a narrow rolled hem on the bottom. Despite my best efforts it's a bit wonky but I intend to only wear it tucked in.
Here it is tucked in, as I'll wear it to work, bear in mind that I am a little larger than my dummy.
I'm pretty pleased with the way this top turned out. The silk satin is beautiful and not too shiny for daytime. There are a couple of creases that I can't shift so I am going to have to take it to the drycleaner to press it for me but after that it should be fairly easy-care since I pre-washed the fabric.

Monday, 5 January 2009

BWOF 07-2008-108 Tunic Part 1

Hi everyone,

I hope you all had a fantastic new year and are feeling optimistic about 2009. I am not going to do a review of 2008 or resolutions at this point as the little counter on the left tells me my blogoversary is coming up soon and I think I'll save it for then.

I'll start 2009 with a project I actually finished last year but it's taken me a while to get all the photos together. It's a simple project but I have done things a bit differently so I wanted to show you how I achieved my result.

The project is BWOF 07-2008-108 the tunic with an inverted pleat in the front. It's photographed in linen, but I chose a silk satin for my version. This is the second top to go with the flounce skirt I made recently.

The pattern is very simple - front and back, front and back yokes and side seam pockets (which I left off). After reading the reviews at Pattern Review I decided I would need an FBA. This is not an easy pattern to make this alteration on, so I made up a 'cheats' way to get extra room in the front.

When I traced the back pattern pieces, I used a straight 38 for the entire yoke and traced the back piece starting at 38 to the bottom of the armholes and then graded out to a 42 at the hips (the magazine photo looks very snug on the model's non-existent hips - it turns out it's not that bad!). For the front I traced a 38 on the shoulders of the yoke, graded out to a 42 at the bottom of the yoke and then traced a straight 42 for the front piece. This is not a fitted garment, I just needed room and this method worked pretty well.

No interfacing is called for - and wouldn't be needed in a cotton or linen - but I backed the yokes with silk organza.

I didn't follow the instructions at all. I completely made up my own way based on how it might be manufactured for RTW - I wanted to put this together without hand sewing (I enjoy hand sewing but sometimes like to challenge myself to pretend I'm a 'real' designer). That didn't quite happen but for a good reason, more on that later.

First I stay-stitched EVERYTHING - silk satin is really unstable! I stay-stitched the neck, armhole and bottom edges of the yoke facings, and the top edges of the front and back pieces. I also basted the silk organza to the facing pieces. Below you can see the back yoke with silk organza and the back yoke facing.
I constructed the side seams first. I used french seams but when I sewed the first line of stitches (the wrong sides together part) I stopped about 1cm below the armhole marking. For the second line of stitching I went all the way up to the marking and back stitched for security. I snipped into the seam where the first row ended and then turned a double hem around the armhole slit using up the 1.5cm seam allowance. It ends up looking a bit like a sleeve placket.
Next I sewed together the yoke shoulder seams, made the pleat in the front and joined the yoke to the rest of the top. This is a shaped seam and can be tricky but you have to keep in mind you are matching the stitching lines not the cut edges. Clip the curves to the stay-stitching and use quite a few pins to keep everything in place and remember that the yoke seam allowances will protrude at either end. For silk and fine fabrics I like to use glass-headed pins - they are pricey but worth it IMHO. As I sew I use a tip from a Sandra Betzina video I watched ages ago. Instead of maintaining the tension on the fabric in front and behind the machine foot as you normally would on a long straight seam, put both hands in front of the foot and massage with your fingers left and right. This manipulates the bias slightly and you'll find you can accommodate a fair amount of ease or curve this way. Try it on a scrap, this tip changed my sewing life!
Next time I'll go through a tutorial on how to face a sleeveless garment completely by machine, an industry technique I learned while working in the bridal studio, and show you the finished garment.

Thursday, 1 January 2009

Final project for 2008

I guess it's fitting that my final 2008 project is a dress to wear out for New Year's Eve. I usually have a pretty casual NYE, so I don't need a fancy outfit but the past couple of years have just been so incredibly hot that my usual uniform of jeans, fab shoes and a cute top is just not possible. This year I decided to make a cool and (hopefully) stylish, comfy dress for lounging around in the backyard at my friends house party. I'm pretty sure I didn't look so chubby in real life - I must be standing funny in the photo!The pattern is Simplicity 4072, a threads collection dress. I have had this pattern for a couple of years and even cut and half sewed it once, but I made really bad fabric choices and it ended up in the bin. I read every one of the 29 reviews on Pattern Review before proceeding, as I was dubious about using a crisp cotton for this garment. The reviews seemed generally positive so I went ahead.

The fabric is a cotton with a border print from my stash, I didn't need to buy anything, so this dress was essentially free! Not having much time available, and the weather being so hot I couldn't be doing with fitting and complicated methods so all in all this dress fit the bill.

The last time I started to make this dress it was pre-happy pounds so I had cut the pattern in a 10. I've noticed that the threads dresses tend to have a lot of ease so I decided to go with it, just adding a little length to the front bodice as a cheats FBA, I didn't need to add anything to the width.

It went together easily, there was nothing particularly complicated and I did everything the quick and dirty method just so I could finish and get back to my air-conditioned living room. I did add pockets as suggested by a reviewer (I poached a pocket bag pattern piece from a random pattern and added them to the side front seams), and I cut the tie double width and sewed it into a tube rather than hemming the edges as suggested. In terms of the instructions, the only note I would make is that before you snip to the underarm dot you should sew a line of reinforcing stitches first so it all doesn't give way later - I am amazed the instructions don't tell you to do this, that is just slack.

The dress was, as intended, very comfy and a couple of people complimented it. We had a good night out and it only took us half an hour to get a cab home - which is a minor (no MAJOR) miracle in Perth with it's useless taxi system.

Happy New Year everyone.

Tuesday, 30 December 2008

I love being on holiday

First a big shout out to Danuta who very kindly offered to buy BWOF in Melbourne and post it over to me. In the end I did find a copy, but not at either of my usual suppliers, which is a worry.

Here is a cute and casual skirt I whipped up in about two and a half hours total. I realised that my casual wardrobe has been badly neglected and I was finding it difficult to find clothes I could wear outside the house. Cotton a-line skirts are great in the heat (it's forecast to be in the high 30's today and for most of the week). I used the same Mrs Stylebook pattern that I used to make this skirt.
There is not much to say about this skirt - it was super easy and a cute style. I just topstitched the pockets on this time rather that use the invisible method I demonstrated in the previous post. It's a casual skirt so it wasn't necessary.
...
I received a terrific gift this week. My gorgeous, clever, talented friend Claire is visiting from Melbourne and brought me these buttons. How cute are they? They are from a designer sample sale (sorry Claire, I've forgotten the name already - it is someone I know of). There are 35. Now I have to come up with a project that will use them all!
I have finished another project and have several on the go (oh, how I love holidays!). I'll post as soon as it's not too hot to model them.

Saturday, 27 December 2008

A Plea for Help!

Hi all,

I know I must be the last person in the world that still buys BWOF at the shops, but for various reasons mainly related to a non-standard letterbox and a cranky postie it is not practical for me to subscribe. Anyway, I cannot find the September issue anywhere! By my calculations, it should have been in the shops at the end of November and I have been checking everywhere I know that stocks it since. I asked my newsagent and he said he couldn't remember seeing one for ages either. What I'd like to know from my Australian readers is: Have you seen BWOF 09-2008 at your local newsagent? Or, alternatively do you know of a shipping problem that's holding things up? I am suffering withdrawals, I even have my fella staking out newsagencies just in case a lone copy shows up!

I never realised what an addict I am (hangs head in shame).

Friday, 26 December 2008

The Optimistic Christmas Dress Part 3

I hope everyone is having a wonderful holiday season, whichever variety of holiday you celebrate! My festivities are over for the year and they have been great but exhausting. I experienced a variety of different Christmases over the past couple of days, from a vegetarian feast on Christmas Eve to a barbeque breakfast and traditional roast on Christmas day. Now I just have to start burning all these extra calories off! The weather has been fantastic - not too hot, not too cold, around 30 degrees on Christmas day. Today, Boxing Day, is forecast to be 29 degrees. By comparison, last Boxing Day was 44 (I don't even know what that is in farenheit, maybe around 110-115)! Last year was tough.

I did finish and wear my optimistic dress and I am happy to report no major stuff-ups, although the cap sleeves are a little snug so driving and reaching across the dinner table were a challenge. Here is the finished product:
It was cool on Christmas Eve evening so I wore a cardi over the top:
Some reviewers wondered how this dress would work with a more prominent butt. I just so happen to be 'blessed' with one of those so in the interests of science, here's a side view. Not the most flattering style for my body type, but I really like the girly, fifities vibe.
All in all, a pretty successful exercise, especially given that I only traced off the pattern and pre-washed the fabric on the 20th.

Tuesday, 23 December 2008

The Optimistic Christmas Dress Part 2

Today was my last day at work until 12 January. And not a moment too soon! To be honest I've been having a pretty rough time the last couple of months and some time away to get my (mental and emotional) strength back is just what I need. I feel really fortunate that I have my sewing to look forward to, even just thinking about projects when I'm too tired to actually do anything has really kept me going.

But enough of that. I am pleased to report that the optimistic dress is going very well so far. I made up the lining for fitting and I ended up not needing to do much to it...


The lining is 100% cotton voile and is a little see-through, which is why I am not modelling it. You'll just have to take my word for it that the fit isn't too bad. I took 3cm off the centre back neck edge, tapering to nothing at the bottom edge of the bodice, something I almost always have to do. Where I graded from a 42 to a 44 at the hip ended up looking a little exaggerated and I didn't need the room so I shaved that off the sides. The only other thing I needed to change was that I had added too much length in the vertical part of my FBA. I just took out the excess length in the lining and it worked fine. I made all these changes to the pattern before I cut out my fabric.

I have now sewed the main parts of the fabric together and the zip is in. I just need to sew in the lining and the sleeves and I'm done. I realise now that I haven't shown you the fabric. I don't have a photo but it is a 100% cotton, black with white pin dots. It has a deep embroidered border along both edges, which I've used on the bottom edge of the skirt and on the sleeves - no hems yay! You'll just have to be patient until I show you the finished thing.

I have a couple of appointments early tomorrow, then home for washing, cleaning, sewing (of course!) and cooking before my new dress gets its debut at my Mum's for Christmas Eve dinner. I'll be wearing it again on Christmas day for breakfast at my Dad's then lunch at my fella's family's house. The best part of all? It can go straight into the washing machine and will dry in about 5 seconds flat! The downside of course being that it will need ironing.

Sunday, 21 December 2008

Optimistic Christmas Dress Part One, the Pattern

I am calling this the optimistic dress because there are four days till Christmas and I have to work two of them and I am still planning to make a new dress! Last year I was completely broke and made ALL of my Christmas gifts, and I had to wear old clothes on Christmas day. This year I made nothing for others and really, really want something new to wear for myself.
The chosen pattern is BWOF 10-07-105. Luckily I always check Pattern Review before starting a new project and I discovered there are some issues with this dress, specifically in the boobage area. Since I am wearing a D these days, I knew I'd better address this rather than take my usual course of action, namely 'hope for the best'.
First I took my measurements - high bust, full bust, waist, hip, plus the length from my shoulder over the fullest part of the bust to where I wanted the empire seam to sit (I hate it when the seam hits the wrong point and just looks dowdy!). I chose the size(s) to trace from my high bust (38 to the under arm), waist (42) and hip (44) - aargh, these numbers are creeping up and I am not happy! Anyhoo, I traced off the pattern, adding 5cm to the skirt length so it would hit just below my kneecap, and then set about dealing with the bodice pattern.
I decided that I would get rid of the bust dart and convert it to gathers under the bust. When you do an FBA you create extra fullness that you need to get rid of in a dart or similar, and I am not a fan of enormous darts.
The next thing was to measure the side seam of the bodice. At only 9cm, this was not going to be deep enough to hit where I think it should (around the bottom of my bra band) so I added 2cm in length to the whole bodice, front and back. Remember if you do this not to just continue the side seam line down - because it's tapered you'll make the bottom edge shorter which will cause problems later. Measure the bottom edge and make sure it's the same as the original, swing the side seam out a little if you need to.
The first step in an FBA is to find the bust point. When I learned pattern drafting, we were always told to shorten the dart to about an inch away from the bust point, I'm not convinced this always happens in commercial patterns as I see a lot of 'pointy boobs', but that's what should be done. I guesstimated the bust point to be about 2 cm from the end of the bust dart in this particular pattern so I extended the mid line of the dart to this point. Then I joined the shoulder, lower edge and centre front to the same point. I also marked notches 2cm either side of the line from bust point to lower edge. These will be my gathering guides - all the new fullness will end up between these marks and then I'll just gather the area back to 4cm.

I swung the dart closed and allowed the bottom edge to open up. I taped it temporarily as I'll use the dart line again later! Thanks to my fella for providing a finger in need - he is fascinated with how I do this stuff and is always willing to help - bless him.
Next I sliced up to the shoulder and open up the amount needed. My full bust measurement is 4cm bigger than my high bust measurement (which doesn't technically make me a 'D' I know, but it's what I need to wear anyway!). This means I need to add 2cm on each side of the bodice, so I opened up the pattern by 2cm.

Still with me? Okay, good. The next step is to take into account the added length of a full bust (the previous step took care of the width). I measured the pattern from the shoulder, through the bust point to the bottom edge and worked out what I needed to add based on the measurement I took earlier. This was 3.5cm. I opened the dart again and this time opened it up at the bust point instead of the side edge, by 3.5cm.

Oh, I really hope this is helping, I'm starting to feel confused on your behalf! Next I cut through to the centre front and dropped this piece down by the same amount.

Finally, I patched all the gaps and re-drew around the pattern piece. Remember on the bottom edge don't just join the gap with a straight line, you need to measure the cut edges and keep this length consistent in the new section (sorry, that's not really clear but I don't know how to write it). You can see how my bottom edge has a curve in the new section. Try to visualise how that will look in three dimensions and I think you'll see why it needs to be this way.

I would normally re-trace the pattern but I've run out of butter paper so this is my actual pattern piece for the time being. Must remember to get to an art supply shop before Christmas!

I'll cut and sew the lining today as a kind of toille, then if all goes well I'll get cracking on the main dress. Wish me luck!

Thursday, 18 December 2008

Project Runway Top

Okay, so I am ashamed of myself with this top. It took way longer than necessary to make! I cut it out on a Friday night, sewed all but the hem on the Saturday. Then it took me a week to do the hem and take photos. THEN I decided to make a minor alteration and it took me another week to get around to that! Anyway, here it is...The pattern is Simplicity 3504, from the Project Runway series. It's a pretty cute little tunic. I picked it because of the options, and in the end I made something that looks pretty much exactly like one of the pictures on the envelope.

I used a very fine cotton voile with a burnout stripe in it. It was cheap, maybe $7 or $8 per metre (that's cheap here!) and I know it won't last past summer but that's okay. There's not much point making summer tops to last here you just sweat all over them anyway and they go all gross, so it's not worth getting attached.

The next photo demonstrates one of the problems of this top - the fabric is so fine that the edges show through. I did french seams on everything except the armholes, so they are quite neat, but the edges of the inset really bugged me:

So I turned in the inset edges and ran a running stitch around by hand to keep them out of the way. I hadn't done this when the photo below was taken, but it is done by the last picture.

The other thing I noticed after this next picture was taken is the drags on the shoulders. I thought originally that it was a full bust issue and there was nothing I could do, but it turned out that all I needed to do was take in the back neck by about an inch on each side. I just took it out of the centre back seam. I make this adjustment pretty often and particularly in Simplicity and Butterick patterns for some strange reason.

Here's a close up with showing through edges and drag lines:


And here is a full length of the complete outfit. Apologies for the 'after work face'.

Is it just me or do I look like a giant pin head? I need a bit of lift in the upper body to compensate for my ample derriere but these sleeves are not really doing me any favours. Ah well never mind. It's comfy and will be great for the hot weather, and it's not too ugly!
Three more days of work until I have two and a half weeks off. Yay for the sewcation! Oh yeah, and Christmas.

Friday, 5 December 2008

New Work Skirt

Here is my new work skirt, part of my 'very small closet' plan. My lovely burmese cat Desmo is not part of the plan but she insisted on being involved in the photo session!The pattern is Mcall M5184, now out of print. The fabric is a light suit weight, bought at Spotlight (no matter how much I hate the place, I still seem to buy a lot of stuff there!). It have a subtle plaid design in grey/fawn/cream. I managed to match the pattern pretty well on the main part of the skirt, OK on the yoke but on the flounce - not so much. Here's the back.
Hmm, I've just realised that photo highlights where I didn't quite match the yoke seamline at the zip - I never seem to get that right no matter how hard I try! I added a lining, and 5cm to the length of the skirt but that's all I had to do. I cut a size larger than usual - principally because I AM a size bigger than usual at the moment. I am optimistically hoping to need to take the skirt in before too long, which should be pretty easy.
I finished the lining with some lace and used bias binding to finish the hem. I suspect I will need to re-do the hem sooner or later because even though the fabric is very light and I hung it for a couple of days before hemming, the flounce is still dropping a bit in the bias sections - probably from the weight of the bias binding I suppose.


So that's it. I am making two tops to go with this as I don't have anything suitable in my current wardrobe. I am making a white pin stripe top and a coral silk satin top. This will mean I can retire a pencil skirt that is a little (OK for real, a lot) snug and two fairly scabby t-shirts I've had for ages!
Now I have to somehow child proof my house this evening. I am babysitting a friend's three year old in the morning! He's a lovely child though and the house does need a good clean! No sewing for me tonight though :( .

Wednesday, 3 December 2008

And the winner is...

Joyce.

Congratulations Joyce. My trusty photographer/chef/competition moderator/fella picked your name at random from the bowl. Please email me your address details and I'll get the package in the post. I hope you enjoy them.

Sorry to Carla and coolobreeze who missed out this time. Please check back as I will do this again when I have more spare magazines.

Friday, 28 November 2008

Still Alive and a Give Away

Hi everyone (she says, optimistically hoping ‘everyone’ hasn’t given up on her!). Boy I’ve really missed sewing and blogging the past few weeks. We have had a big couple of weeks at work, where everyone from our offices all around the world have flown in. We have had our staff conference, days on end of presentations and meetings, all culminating in a big industry event all day today. The preparations have been enormous and my section I have to say has been pretty hard hit, being responsible for providing statistics, performance figures and other information that’s needed to all these presenters – nightmare. That’s not to mention we are two people down in our team and likely to stay that way, thanks to budget cuts (don’t you love a change of government?). Oh yeah, I almost forgot, I was interviewed for my job last week! I am reasonably confident having actually done the job on contract for the past 7 months, and it will be nice to have a permanent job, but it is an extra stressor in my life that I would rather not have! So I apologise but I have just been TOO TIRED to blog (yeah yeah poor me – I do realise there are a lot of people worse off than I am, so don’t think I am a martyr!).

Anyway, I have been doing what I can, when I can – usually half an hour here and there so I have a couple of almost finished projects that I will be able to show you soon. I’ve also been planning again. Summer is coming (although you wouldn’t know it by the mild and rainy weather) and I have nothing office appropriate to wear.

I’ve recently been reading Jennifer Skinner’s blog ‘The Very Small Closet’, and I really like her ideas. You can get the full run down at her website, but essentially it is based around individual outfits, rather than fully interchangeable separates. This idea works for me for a couple of reasons:


  • I wear different styles of tops with different bottoms – for my body shape an empire line works with straight pants, a fitted T works with wide pants or a-line skirts and fuller styles of top work tucked into a pencil skirt.

  • I get bored really easily - I love bright colours but in small doses. I want green and coral and aqua and teal in my wardrobe but not together! In this plan I can have a wide variety of clothes that don’t have to all coordinate – as long as I can make two outfits from each bottom garment.

However, I still love looking at other people’s SWAPs!

So the very small closet principle consists of six bottoms, each with two tops, and up to six layering garments (jackets, cardigans or whatever). I will add to this three work appropriate dresses. This will give me three working weeks of outfits without repeating – that’s good enough for me! I have been through my existing clothes and thrown away everything that’s trashed, given away everything I hate, and packed away everything that I love but is too small (a depressingly large pile!) and I have pulled together enough outfits to start along with a clear list of priorities that need replacing!

It’s working pretty well so far and I kid you not when I say I am getting out of the house at least 15 minutes earlier every morning! I won’t be able to sew on a whim so much, but then I shouldn’t end up with so many orphans either. This plan doesn’t include casual or special occasion clothes, which I also need so I will definitely be busy! It will also keep my storage needs under control as it’s a one in – one out kinda deal. I am just hoping that work settles a bit soon and I am having some time off at Christmas so as always I’m optimistic.

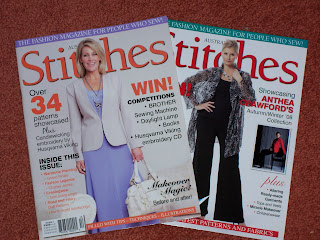
Finally, I have a give away. I’ve noticed a few of these cropping up around the place and I am such a joiner! Australian Stitches is the one sewing magazine that’s easy for me to access. Burda is quite exclusive (I have to go out of my way to get it) and Patrones – no way (I’ve never even seen one in real life)! Each issue I buy comes with extra magazines and since I’ve been reading it for so long I generally already have the bonus issues. Here are two extra copies that I have and I am more than happy to find them a loving home. Simply leave a comment and I’ll draw a name at random on Tuesday night, the 2nd of December my time (which is 9 hours ahead of GMT – you do the math). I’ll cover postage to wherever in the world the winner is from so don’t be shy – I’d love to hear from you.