Since the Pattern Review My Pattern Competition ended (and if you haven't checked out the entries you really should - there is some amazing work!) I've been taking it easy a little. Well not really, my acting manager at work left a week ago on Friday and our new manager doesn't start until August 25. I am trying to get some really big contracts off the ground but it's pretty hard when there is no-one close by to give me approvals. Our acting, acting manager comes from a different department and while she is really nice, she is not a specialist in my field so I can't just run things by her. I also had to go to Sydney this week at pretty short notice. I flew over on Wednesday evening (4 hours), had a meeting on Thursday morning and then flew back on Thursday afternoon (5 hours + a half hour delay). It is not really unusual for people from Perth to do this, but it's been a while since I've had to and I'm a bit out of practice, plus I seem to have picked up one of those aeroplane colds!
Still, I did get the chance to visit the Darling Harbour Tessuti store and offload some of my hard earned cash! I bought some black wool for a coat, some spotted Japanese cotton and a remnant of a printed cotton voile - I'm sure they'll crop up here eventually.
Oh yeah, and I did some sewing...
I had never heard of Mrs Stylebook until I started reading people's blogs and I've only bought one - Winter 2007. This skirt appealed to me as it's a pretty easy draft to cut my teeth on. I was curious to see how the Japanese drafts would fit my curvy and (apparently) 3XL figure.

As this is a work skirt, I almost left the pockets off. I just don't like the look of topstitched pockets on dressy things - although I love it on casual garments. My work is pretty casual so it wouldn't be a problem but I wanted to have all the stitching concealed. I thought about hand stitching the pockets on but that wouldn't be strong enough. I finally remembered an old article I had cut out of an issue of Australian Stitches that talked about machine stitching pockets on. I dragged it out and decided to give it a go. Here's a bit of a step by step for those who haven't seen this before - I love the finished look and it's not as hard as you might think.
First cut out your pocket pieces and two lining pieces per pocket (so for two pockets use four lining pieces). I interfaced my pockets with some (extremely crappy) fusible interfacing, which I think is a good idea in most situations - just don't use the cheap sh*t from Spotlight like i did.

Sew one lining piece to each pocket piece and fold it to the inside as normal to create the faced top.

Fold down the seam allowance on the other lining piece and lay it on top of the lining side of the pocket unit with the seam allowance facing outwards. Sorry, this photo isn't terrifically clear.

Sew all the layers together and run a gathering thread around the rounded corners. Turn the seam allowances in using the gathering thread to help and press. If your seam allowances are more than 1cm then you should probably trim them back to 1cm at this point.

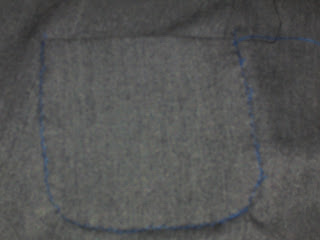
Lay the pocket in place on your garment and tack it in place with a narrow but long zigzag, just catching the folded edge of the pocket. I did this in blue so it would be easier to find and remove later.
Now the tricky bit. You need to fit an open toed foot to your machine (you may be able to get away without one but I have one and had never used it before so...
Place the edge of the foot on the raw edge and stitch the pocket down through all layers from the inside - this ends up being about 2-3mm inside the folded edge which gives a really nice 'floating' effect. The narrower the pocket the harder it will be but the zigzag ensures it doesn't slide around. The first time I got couple of tucks in the curves but it was pretty easy to go back and fix it.

Then flip the back piece of lining against the garment and stitch by hand or machine close to the folded edge. Both sides of the pocket are now lined and all the raw edges are concealed.
 See, isn't that neat!
 To hide the last little bits of seam allowance you need to stitch down the top corners. I decided to do a little rectangle, but I dare say other techniques would look just as good. I counted the stitches to get the size as regular as possible.
 Other than the pockets, the construction is basic - invisible zip, a couple of darts, the lining is eased to fit the lower edge of the waist facings and a hand sewn hem. And here is the finished skirt.
 It's so nice that even though I've been sewing the best part of thirty years that it still challenges me. I'll probably make this pattern again, both for work and for casual wear and I'll definitely be putting my pockets on by machine in the future!


2 comments:
I love the way you have done these pockets. Thanks for all the photos, your skirt looks terrific.
Lovely skirt and very well made! Congratulations!
(I only tried a Mrs Stylebook pattern once! The results were quite good and I'm willing to try some other patterns from this magazine!)
Post a Comment