Monday, 31 August 2009

Prep for the Wardrobe Competition

Okay, so I have decided I will enter the PR wardrobe competition. One look at the sea of black and grey on my washing line this weekend convinced me once and for all to get out of my rut and embrace some new colours. From what I have been reading on the discussion boards people seem to have a lot of great ideas and I can't wait to be a part of it!

My plan is called "A Parisian Spring in Perth", being of course in the southern hemisphere where we are going into spring rather than autumn. My plan started from the fabulous hand woven silk tweed I bought a couple of years ago when I first started working at the fabric shop. It was the end of the roll so I was stoked there was enough for a jacket - Chanel style of course! The fabric and its equally gorgeous olive silk satin lining have been waiting for me to attend to them ever since so finally I can get this fabric out of the sewing room and onto my back where it belongs! I have debated joining the Go Chanel or Go Home as everyone is doing such a great job over there at offering support and advice, but I think the commitment of posting to two blogs plus writing reviews of all my patterns on PR, whilst maintaining a pretty high production rate might be a bit much. I'll still be reading though.

The colours in the tweed have really inspired the palette of the wardrobe. I have all the fabrics I will need but may slightly tweak a pattern or two here and there as I go along (I am particularly concerned about the pattern for the pale lemon lawn). The wardrobe will consist of:

1 topper - the aforementioned Chanel-style jacket
4 bottoms - Dark olive pants and skirt, taupe skirt, navy pants
5 tops - ivory tunic, lemon top, floral blouse, teal and cream t-shirts

This plan is not only going to be a challenge time-wise but style-wise too - THERE IS NOT ONE THREAD OF BLACK ANYWHERE! I don't wear head to toe black all the time or anything but, like most people, I do tend to fall back on it pretty readily. Also, I am usually pretty timid about prints and mixing a floral with a tweed is pretty out there for me, but I am confident they compliment each other quite nicely.

I am itching to get going but I can't cut anything until the competition starts tomorrow. I have cut out and altered most of my paper patterns and have toilled the jacket. Actually I have done that twice since I was originally going to make McCalls 5007 but I ended up not liking the style on me, I switched to McCalls 4972, convinced I wasn't going to like it but am now in love - the shape of the jacket is going to be fab!

I have also made a practice pair of pants from the altered pattern I've been posting about lately. It worked, they fit really nicely. Sorry no pics yet as my fella is working nights at the moment - as soon as I see him in daylight hours I'll get him to take some photos.

So I am as ready as I'll ever be, and can't wait to get cracking.

Monday, 24 August 2009

Thinking About the Next Challenge

Hi everyone,

I'd like to start out by thanking everyone who commented on my last post, it feels a lot better to know I am not the only one who needs to make more than just the odd 'tweak' to make a pattern fit. I'd especially like to thank Marianne, who is currently going through the same pants-pattern process (nice aliteration!) as I am. Marianne's finished pattern looks a lot like mine, which is a relief to say the least! I love her analogy that commercial patterns are drafted for 'a b-cup butt'!

I still have not made up a final pair of pants, I haven't done any sewing for 2 weeks now. I have been experiencing really low energy for the past few weeks, I feel like I am three-quarters asleep pretty much all the time. What's worse is it makes me really clumsy - I banged my head on my car door on Friday and ended up with a big lump and bruise so I spent most of the weekend sitting around with an ice-pack on my head. I have just started seeing an acupuncturist about my sciatica and he thinks that it is all related and can be fixed at once - I am very excited about that!

Fortunately my physical inactivity has not spilled over into mental inactivity. I am seriously considering entering the PR wardrobe competition that starts on September 1. I have the fabrics, the patterns, the desperate need for clothes. plus the desire and motivation to challenge myself. However I am concerned that I won't have the time or the energy to actually do it. I am currently acting 'as if' I'll be entering, cutting out patterns and pre-washing fabrics, and I have told myself that if I can make a toille of the jacket before Thursday then I'll sign up.

The main issue being that my chosen plan is fairly involved and my time is so limited. Making 11 garments in 12 weeks would likely be a challenge for anyone, and it's well beyond my usual production rate. Plus there is the need to document everything which doesn't take too long, but would steal valuable sewing time.

I've written up a schedule which incorporates 1 hour a day on about three days of the week and 3 hours on a Sunday, this really is the most I can hope to fit in. It sounds like a lot of time, and if I keep everything simple and stick with patterns I know will work without too much fiddling I should be fine, but the jacket I have in mind is a Chanel jacket! There, I've said it! Do you understand my reservations now?

I won't make my final decision until Thursday so stay tuned for the plan! Chances are, if I don't enter I'll sew along anyway.

Monday, 10 August 2009

A Pair of Pants that Fit - I Hope!

Let's talk about pants. This immensely practical garment is a nightmare for me - buying, making, you name it. I have a large, low, wide butt and it is a body challenge I am still trying to embrace. I have been reduced to tears from jeans fittings and at the very least become incredibly sulky at the thought of trying to find a pair of pants that fits. Fortunately I have managed to find a couple of pairs that fit passably well and have worn them to death.

Just make them you say? Hah, that's even worse! While I can take on pretty complex fitting issues generally and I have made fantastic pairs of pants for other people, I just have not had any success on my own body.

The worst thing about pants is it targets all my attention on my number one body hangup - my rear end! Normally I go about my business, completely ignoring it but it becomes front and centre (not literally of course) when the topic of pants comes up.

Anyway, in the interests of becoming a well rounded person I have decided I need to make a pair of pants for myself. After reading the reviews on PR I decided that Simplicity 2700 would be my victim. I like the idea that at least some of the work would be done for me in the shape of separate pieces for 'curvy' people. Of course I knew there would be more to it than that, and that the distance around your derriere is only one part of the equation, but it's a start.

I took my measurements honestly and compared to the envelope. By my hip and waist I should be a 16, but my crotch length was off the charts even for the curvy shape (I knew this would be the case and wasn't surprised). I looked about at all my fitting references and felt that I would be best served by adding a wedge to the centre back seam (4cm) to lengthen the straight part of the seam above my actual butt. The reviews I read suggested the pattern runs quite large so I decided to go with a size 14 to start with.

I made a toille, had a little cider and tried it on. What did I see? A depressing mess that's what. A saggy front crotch, weird vertical folds in the front, the back 'crept into the body space' (as Simplicity so delicately puts it, but note that 'crept' is an understatement!), smile lines under the butt, and that 4cm I added - well I had to pinch all of that out again. About 5 seconds away from giving up in despair my fella walked into the room and said 'those pants make your legs look well long'. Given my stumpy pins are my number 2 body hangup I figured that was good enough motivation to persevere!

Back to the drawing board. This time I referred to Threads 122 and its discussion on body space. I left it alone for most of the week (as I started my new job and was exhausted) and then came back to it refreshed on the weekend. This time I took my flexible ruler and formed it around myself to get my actual curve shape, size and length. I laid this on the back pattern piece to compare. I am telling you I really had to let go of a lot of pride to go through this! I kept telling myself 'it doesn't matter what you have to do, if the pants fit great you'll look great in them - no one will know what you had to do'.
Here is the flexible curve laid on the back pattern piece, with a cutting line marked

I split both pattern pieces along the crotch line and slid the front crotch in by 1cm and the back crotch out by (you guessed it) 4cm. I also took a 3cm tuck out of the front crotch length, tapered the extra size created on the side of the back piece back into the pattern piece at around the knee and added and extra 1 inch to both side seams all the way down (turns out I probably should have started with the 16 but never mind!).
Here is the pattern ready to go for toille #2:
And the back piece on its own: Now the second toille. I only made this one to knee length as I was short on calico, had another cider and tried it on. What a difference! This was closer to what a first fitting should be, I only had to make minor tweaks - shorten the front crotch a little more, remove 2cm from the front crotch point (note - my front crotch is now almost straight, but it's working), scoop out the back seam a fair bit more and fine tune the side seams (ie. took off 1cm of the 1 inch I added so I only ended up adding 1.5cm to the side seams in the end - make sense? Sorry, I switch quite comfortably between metric and imperial!).

Here is my final (I hope) pattern - doesn't it look strange?
I know that the side seam will need further refining but I can easily do that in the fabric.
So where am I at now? Time to make the actual pants, wish me luck! I must say I am feeling quite enthused about it now, although I still cringe when I look at the back pattern piece! But if it works it will be well worth it.

Is it just me, or does everyone have to go through such massive alterations? I know many of you out there can make direct from the pattern and I am so jealous, but this process does highlight to me the wisdom of using TNT patterns.

Monday, 27 July 2009

RTW Knockoff Competition - Photo Shoot

As promised here I am modelling the finished dress. As a illustration of how versatile the style is, I've put together a look for each season so you can see how I might wear the dress all year round.

As it is currently winter in my neck of the woods, I'll start with my winter look. This is probably how I'll wear the dress for the next month or so. The dress works well as a layering garment as it it neat fitting enough to wear with cardigans and jackets but has enough room to slide a fine polo neck underneath. The astute among you might recognise the mermaid scarf I started ages ago and never posted when it was finished.

Next up, spring. I like how this dress is dark but not too dark so it can be worn in warmer weather without looking too heavy. This is my spring look with a simple cardi.

Summer is the 'purest' look so here is a front and back view. I am really happy with how the dress turned out. The fit is nice and it's really comfortable.

Finally my autumn look. I quite like this one, it's a bit St Trinian's although my fella (rather unkindly I felt) pointed out that I could look like a convent novice if I'm not too careful! I'll have to either use really funky accessories or maybe a non-white blouse in future.
So that's a round up on my entry. I hope you like it - I certainly do. I have found the whole project a lot of fun and very motivating, which I hope I an carry forward into my upcoming projects.

Sunday, 26 July 2009

RTW Knockoff Competition - Done!

The cold that I was battling last week turned into a really bad cold that wrote me off for the entire weekend. I recovered a bit through the week but now I have developed a really nasty lung infection and am not feeling myself at all. Fortunately through clever prioritisation of tasks (ie. not doing any housework or grocery shopping) I have been able to work on my competition entry and, yay, it is now done!

There weren't any particularly difficult aspects of construction, so I focused on precision, neatness and good fit. Here are a few photos of some processes...


One of the first steps was to make the french darts. Because I made an fba there was a lot of fabric in the dart so I sewed a line of zig zag about 6mm from the sewing line and trimmed away the excess fabric.

I really like how the french dart changes the grainline of the side front. It's a subtle feature but I think it's pretty.
I ended up reshaping the dart slightly to cut in under the bust. It was looking a bit sack-ish before this alteration.
I have a traumatic relationship with invisible zips. When I used to teach I always managed to get my students to do awesome invisible zips so it's not that I don't know how to do it, it's just hit or miss as to how well it goes on any given day. I have learned to do them early in a sewing session, after I've warmed up but before I start to get tired and lose focus. I am super happy with the zip in this dress though - it is almost invisible!
I finished most of the seams with a Hong Kong binding. The seams that are completely enclosed (shoulder and armhole) are finished with zig zag. The fabric is very ravelly so a line of overlocking would probably just pull away. I like the look of bound seams anyway. I overlocked (serged) the seams on the lining.
This is the hem facing on the front. You can see the inside of the centre front pleat.
Here is the front pleat and hemline from the outside. The hemline shaping is a lot less exaggerated than the inspiration dress but I do not have legs like a baby giraffe so I prefer to keep them covered up.
Here is the finished front view on the dummy.
And the finished back view. I've just realised ow peculiar the mirror reflection looks. My dress does not have three sleeves!
Being winter it's hard to get daylight shots, which I need for black garments but I have a day off tomorrow and my fella is finishing at lunch time so he has said he'll take pictures of me in the dress when he gets home tomorrow. If you're lucky I'll be well enough to wash my hair and put on some slap, otherwise I'll just have to blur out my head or something!

Saturday, 18 July 2009

RTW Knockoff Competition - Fabric

Just a quick catchup today as I am trying to fight off a cold before it gets its hooks in. I am travelling well on my RTW knockoff entry, the lining is cut out and I'll cut the main fabric tonight. With luck I'll get a good chunk of sewing done tomorrow. There are still a couple of construction issues I have to work through but I am going to have to work it out as I go.


Here is the fabric, it's a mix of really dark charcoal and ivory threads. The weight is very light and drapey, so I am not sure how it will take a pleat but I do think the drape of it will suit the dress well.
Apparently it is 65% wool and 35% polyester, I'm pretty sure it originated in Asia and I am sceptical as I wouldn't say it was the highest quality suiting I've ever come across but it's not terrible either. I'll have to ask my sister to touch it - she is horribly allergic to wool and can tell instantly if there is any wool content in something.

When I pre-washed it the smell was terrible - like strong petrochemicals, maybe that was insecticide.
My original plan was to add a contrast border around the hem as it looks a bit like the original has some sort of band. I bought a metre of black crepe but decided it looked too heavy with the main fabric. Luckily there is enough to make a skirt from later!

Sunday, 12 July 2009

RTW Knockoff Competition - Toille

Hi all,
Thanks for following along with me on this project. I am finding it has really reinvigorated me and I am enjoying the process immensely. Although day dreaming all day and trying to ponder construction issues is not very helpful when I'm trying to wrap up at work and hand over all my projects - but boy, is it fun!

Here is my toille with a description of the pattern changes I made after fitting it...

Fortunately all the issues are easy to fix so I will go straight into fabric this week.

On the front, I made an fba by slicing through the french dart and continuing to the centre front. Next I pivoted the pieces to add 1cm at the bust (note: my dart doesn't point towards the bust point but my trusty Readers Digest book seems to indicate that this method will work). My french dart is now enormous but trimming and grading later will take care of that. The dress was also a little snug at the waist so I added 1.5cm there, tapering to nothing just under the armhole and at the hip. I think this will balance the silhouette a little and get rid of the 'lump' of shaping at the side hip. The sleeves and neckline are fine and I am really pleased with how the front pleat looks.


On the back I made the same side alteration and, in addition, reshaped the centre back. Apparently I have an 'erect' figure (I have several ex-ballet teachers who would strongly disagree) so the upper back was too big. I took 1cm out of the seam above the waist and added 1cm below the waist to make a little extra room for my ample derriere. Interestingly this straightened out the centre back seam so putting in the zip will now be easier.
The only design feature I had to modify was the shaped hem. Mine will never be as extreme as the inspiration (my knees are definitely not my best feature), but I did want it a bit more obvious than this. I have now fiddled with the pattern to make the sloped portion a sharper angle.

Next I'll introduce the fabrics as write a little about how I'm planning to construct the dress. Stay tuned!

Friday, 10 July 2009

RTW Knockoff Comp - The Pattern

I thought I would have to draft the pattern from scratch for this project but a quick hunt through my stash turned up Vogue 2538 (OOP).
This pattern is like a bad penny (except in a good way)! Some of you may remember this pattern was a contender for my winter coat last year, but I couldn't use it because I had previously cut out a size 10 and couldn't be bothered grading it up to my current size. Kristy wrote to me at the time to let me know the dress was a winner. By some miracle I hadn't cut out the dress pattern and the 12 was still intact. Here are the original pieces:You probably can't see well but there are some really nice features - the shaped back seam and the french darts principally.


Of course there are a couple of changes needed to the base pattern to get where I need to go.

On the back:
  1. Added 3cm at hip level tapering back to nothing at the waist (this dress is quite narrow through the hips and that part of my body is not size 12!).

  2. Made a 2.5cm sway back adjustment, removing length above the waist.

  3. Added 2.5cm to the centre back hem length tapering to the original length at the side. I'm not sure if this will add a slight train to the back hem or compensate for the sway back - either way I'll see how it looks.

You can see the back pattern has a rather odd shape now, but I think it will stop my side seams swinging forwards.

On the front:
  1. Added 3 cm at the hip. I folded out the french dart before drawing in the shaping so the dart will still fit in as designed.

  2. Added a pleat at the centre front. The dart is 1cm wide at the neck edge and 5cm wide at the waist, with the flare continuing all the way to the hem. I added these distances twice to create the front and back of the pleat (make sense?)

  3. I shortened the front length by 5cm at centre front and squared out across the pleats. I followed the original hemline at the side seam for the first 10cm then used a straight line to join the two points. I hope this will be enough to mimic the hem shaping in the inspiration. I'll draw the band depth on the toille so I can see how it will look.

  4. I didn't do an fba, but going by the tissue measurements I should have enough room in the bust.

The pattern pieces were really difficult to photograph so I hope you can get enough details to see where I am going with this.

I'll use the original sleeves and omit the collar.

Next post I will show you the fabrics I've chosen and the toille. Fingers crossed it'll work out!

Thursday, 9 July 2009

5746 is My Lucky Number

McCalls M5746 turned out to be my lucky dress after all. Now I can let the cat out of the bag.

I wore the dress to a job interview at another Government Department and whadya know? I got it. It's a promotion, closer to home and seems to be a really interesting role. It's a newly created position too so it's a chance to make my mark on something.

What's even better is I have to use up all my flexi and banked hours before I finish on July 31, which means I'll only be working 4 or 3 day weeks until I go.

A perfect chance for me to do extra work on my RTW knockoff entry...

Saturday, 4 July 2009

RTW Knockoff Competition Part One - Inspiration

I've entered the Pattern Review RTW knockoff competition which runs through the month of July. I've been feeling a little unproductive lately and I think this will help me get back on the horse, so to speak. I'll be documenting the process here and writing a review over at Pattern Review with links back here.

The idea is to take inspiration from a RTW garment or outfit and create an interpretation or copy of it - mine will definitely be an interpretation rather than a direct copy.

First, my inspiration. In this month's Australian Marie Claire, the ONLY garment that caught my eye was this dress from the Calvin Klein Fall 09 RTW collection.


Image from Style.com (second from the left on the bottom row).


I love that it is flowy and loose but without looking like a sack. The pleat down the front will give a strong vertical (and therefore slimming - I hope) line and also gives extra fullness to the skirt. I also love the shaped hem line.

A quick search turned up side and back views, which is handy!

Image from Newsday.com.
Image from wwd.com.

I'll be making some changes to account for the fact that I am not a 17 year old supermodel.
  1. I'll add cap sleeves to balance my hips.
  2. I'll keep the shaped hem but make it less extreme so it's a bit longer in the front.
  3. I may or may not lower the front neck - I'm not sure how such a high neck will look on a d-cup bust.
  4. It looks as though there is a plain band around the hemline (but I can't exactly tell), I will most likely add a hem band and I will make a feature of it.
  5. Finally, and most obviously, I won't be using an evening fabric (the inspiration dress is some kind of wonderful silk-metallic-burnout-velvet) I will make it in suiting to wear for work

I am pretty excited about this project, I think it looks deceptively simple. I reckon it will be a challenge to get it to look sleek and not frumpy, and the front pleat may introduce some grainline issues that could be a problem. Also the shaped hem means that the inside of the dress will be seen at the hemline, which means I will have to come up with a clever way of finishing the inside. I think I'm up to it though. The next stage is to find and modify a pattern and make a toille.

Thursday, 2 July 2009

M5746 The Lucky Dress (I hope)

The pattern is McCalls M5476.

(Sorry about the unflatering shaft of light - it was a really sunny day).
Pattern Description:
Dresses A, B, C are slim-fitting and have lined bodice, front and back darts, back slit and back zipper; dress A has collar with pleats, self carrier and contrast tie ends; dress B has collar with pleats and cap sleeves; dress C has gathered sleeves and ribbon belt; lengths are 1" above mid-knee.


Pattern Sizing:
4-12. I cut a 12 at the top grading to a 14ish at the waist and hips.

Did it look like the photo/drawing on the pattern envelope once you were done sewing with it?
Yes, except for my minor changes.

Were the instructions easy to follow?
They were fine, I only glanced at them and used a slightly different construction method (because I lined the skirt and used an invisible zip).

What did you particularly like or dislike about the pattern?
I love the radiating darts mostly, although they don't really show up on my fabric as much as I thought they would.

The cap sleeves are cute too but I do get a tiny bit of armpit cleavage which isn't so great - but I think that's because I didn't do an fba.

Fabric Used:
Rayon poly lycra blend with a little stretch to it. I lined it in acetate.

Pattern Alterations or any design changes you made:
I graded out at the waist and hips, lengthened the skirt to just below my knee, converted the back split to a vent and made a sway back alteration.

[As an aside, I have always had major trouble with the sway back thing. It is only during the construction of this dress that I finally worked out I needed to make my alteration above the waist and not below it. This is why skirts and pants fit fine but blouses always look a bit weird!]

Anyway, I also altered the collar significantly. I used the original pattern piece but cut it so I would have a finished width of an inch. When I sewed it in place onto the neckline I snipped the seam allowance on the left side of the front bodice so the band would fold back onto the bodice. I held it in place with three vintage buttons that someone gave me in return for hemming his jeans.

Oh, and I also lined the skirt.

I didn't do an fba and if anyone figures out how to do one on this style please let me know!

Would you sew it again? Would you recommend it to others?
Yes and yes. I think this style would work for many occasions depending on the fabric chosen.

Conclusion:
I wore this to work on a special day and I hope to find out soon if it's now my lucky dress!

Thursday, 25 June 2009

This is a gift I made for a girl at work who has left to have a baby. She was only with us for a few months but we got along really well and she made such a contribution that I felt I really wanted to make something nice to give her as a leaving gift.

I used the Li'l Monkey pattern from Stitch and Bitch – The Happy Hooker as a base but made plain granny squares, did 5 rows of 5 (instead of four rows of four), and added quite a wide border. All this was essentially because my yarn was finer than the one specified in the pattern.

I chose the yarn primarily on colour availability. It was pretty reasonably priced at around $3 or $4 per ball (I can’t exactly remember). Unfortunately I managed to throw out all the ball bands so I can’t tell you the brand. It is 8ply and cotton-y in texture, but very soft.

I’ve never made a baby blanket before but I quite enjoyed it. I crocheted some of the border in the car on the way to my mini-break in Margaret River which passed the time and allowed me to make good progress without getting too bored.

I love how it turned out. The colours are lovely and cheerful and it’s a pretty good size – about 65cm square.
I am now working on another blanket, this time for my stepsister-in-law. This blanket is a knitted one and is all in one piece. Aside from having a lot less ends to darn in, which is a plus, I am finding it quite tedious. I need to find:
a) some free time, and
b) a couple of lightweight dvds
so I can get over the hump on it!
Here's a close up on a few of the squares.

Tuesday, 16 June 2009

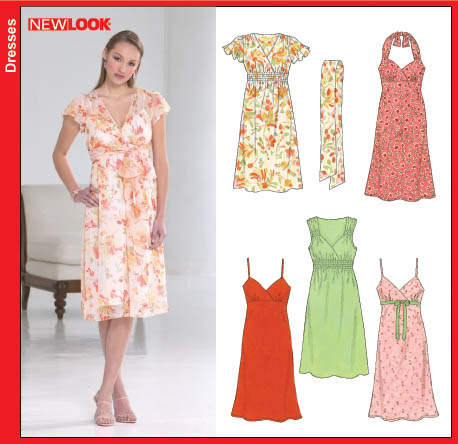
New Look 6588: The Birthday Dress

So here, finally, is the review of my birthday dress…

My original plan was to use Vogue 2978 but on reflection I decided this dress would not be the best choice for me because:
  • I think the gathered neckline would make my full-ish bust look lumpy,
  • The puffy sleeves could be a little ‘young’,
  • Raglan sleeves are not always the best choice for narrow shoulders,
  • The low armholes would do nothing for my short torso, and last but not least
  • Since my waist is a full inch higher on my left than my right (thanks to my sciatica) putting an elastic band around this part of my body would only highlight my lopsidedness.
After careful consideration I decided to go with New Look 6588 (which seems to be OOP now) instead as I didn’t have time to stuff around getting a muslin right.

My colour choices were chocolate brown, rich purple or navy blue. Navy was the only colour I could find in the shop so that’s what I chose! I knew it would be really cold on the night so I would have to layer up. This was always going to involve a long-sleeved black tee and black opaque tights. That’s why I chose to make the slip in black rather than matching it to the dress, I figured that one consistent colour in the under-layer would look better than having a navy slip.

You've already seen it on me so here it is on the dummy.

Pattern Description:
Dress with flutter sleeves and elasticated empire waist with bias cut slip.

Pattern Sizing:
8-18. I cut a 12 tapering to a 14 on the hip.

Did it look like the photo/drawing on the pattern envelope once you were done sewing with it?
Yes except for the change I made to the elastic placement.

Were the instructions easy to follow?
Yes, they were pretty clear, I'd rate this a fairly straightforward pattern, the difficulty would lie in making it in a temperamental fabric.

What did you particularly like or dislike about the pattern?
The slip was a complete freakin nightmare to make! It doesn’t fit very nicely on the bust and the pleats are quite bulky for an under-layer.
Mostly the fabric was just terrible to sew. I’ve worked in bridal and had a fair amount of experience with silk satin but this one has such a tight weave it repelled the needle. I tried a couple of size 60 microtex, which snapped from overwork, but the size 80 microtex made a terrible noise as it punctured the fabric (and no, I didn’t have any 70s on hand to try). In the end I finished the lower edge of the bodice (where it joins to the skirt) with zig zag instead of trying to bind it and I finished the bottom edge with an overlocked rolled hem.

I made French seams on the sides. When I tried it on at first it looked like a sack, so I took in the side seams, forgetting in my haste that it would get shorter so it is a smidge shorter than I would like. That will teach me to make things in a hurry I suppose.

If I wear the dress again I’ll definitely make a new slip and probably not from this pattern (or fabric).

The dress was a dream to make in comparison. It went together easily, fit nicely (mind you there isn’t much fitting involved) and looks great (imho). I used very fine French seams throughout (about 3mm) except the armhole seam which I zig zagged and trimmed back, rather than bind and topstitch as in the pattern instructions. I hemmed the bottom with a straight stitched rolled hem.
Fabric Used:
The fabrics were silk chiffon for the dress and silk satin for the slip.

Pattern Alterations or any design changes you made:
The only alterations I made were on the dress:

  • I used the selvedge instead of hemming the straight opening at the top of the flutter sleeve,
  • I took 3cm out from the back neck, tapering to nothing at the bottom of the bodice seam, and
  • I used the elastic guide from the vogue pattern to space out the rows of elastic and bring the lowest row down to the bottom of my rib cage (the lowest point before I go wonky).

Would you sew it again? Would you recommend it to others?

I would actually. The style lends itself to a range of fabrics and occasions. In a print it might be okay for work in the summer.


Conclusion:

So what do you think? It’s a bit different for me, not really being the floaty type but I like it.

Here is my fella helping with the photo shoot.