Wednesday, 30 July 2008

The Suit is Finished!

Drum roll please....

The PR pattern competition suit is finished. Sadly my photographer is working tonight so I am unable to provide pictures with a model (ie. me), you'll have to put up with yet more dummy shots. I have a work function tomorrow evening so this is my last chance to post before the deadline. The usual disclaimers apply - try and visualise the dummy as half a size bigger and you'll imagine how the suit looks on me. Without further ado.

The front view:

Back view:Side view:

A close up of the back:

And finally a close up of the collar and front band:

I wish I could say I was 100% happy with the finished project, but maybe I'm just a perfectionist. Still, isn't what keeps us striving to improve?

I think the skirt is fab; it fits well, looks sharp and is comfortable to boot.

The jacket is pretty good; I think the collar looks a little small. Also, I guess it's particularly hard to get a nice fit around the armholes in this kind of style, but I wish I could have got it completely smooth. On the other hand, the wrinkling is minimal and it is very comfortable.

The fabric sewed and pressed like a dream and, overall I have to say I am very happy. Just not ecstatic. Hmm, I probably should sell this project a bit more, since it's a competition entry, but I feel honesty is important. Please don't think I'm being negative, my self criticism is all constructive!

Anyway, here it is. I hope you like it. And if you do, send me a message to let me know.

Bye for now.

Saturday, 26 July 2008

My Pattern Competition - The Skirt is Finished

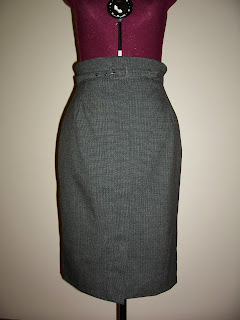
Well here is the finished skirt. Front:
Back:
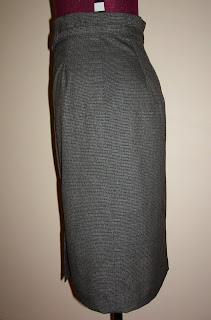
Side:
And a couple of close ups. The front vent/split:
The raised waistline and self belt:
I am really happy with this skirt, as usual my dummy doesn't do it justice. I can't tell you how happy I'll be when I am the same size as her again!

I only have to make the lining and do all the finishing and the jacket will be done too. I was hoping to do a photo shoot tomorrow but, not only will I not be finished in time, but being the middle of winter rain is forecast for the whole of next week. I'd better get a move on since the comp closes on Thursday. Plus I am thinking of entering the mini-wardrobe competition that starts on August 1. Talk about going competition mad! Of course, as we all know it's not about competing with others. For me at least, I need all the help to stay motivated I can get.

For all those bored with my dry, boring pattern drafting posts - don't worry the end is near.

Sunday, 20 July 2008

My Pattern Competition - The 2nd Jacket Toile

Here are the alterations I made to the jacket pattern. The red lines indicates what will be removed and the blue paper is what I have added. Actually there were a couple of more tweaks after these photos but my camera batteries ran out .

The front pieces:
And the back pieces:
Finally, the collar pieces (half pieces only):

After a strong talking to (thanks again Sarah) I decided to make another toile. This time I used a nasty shiny stretch suiting that I bought donkeys years ago, when nasty and shiny was the only way stretch suiting came! But at least the weight of it i comparable to my actual fabric. I cut it out whilst half asleep (these days I am generally at least one-quarter asleep!) and failed to notice the nasty shiny suiting had a lengthwise stretch, which meant my toile stretch in the wrong direction! I left off the front bands and just extended the front pieces to meet at the centre front, purely to save time. Still it was enough to check the alterations and decide I am good to go into the fabric with only a couple more tweaks. I won't go into detail as it's really just more of the same - essentially I had to shorten the underarm seam a bit more and take some fullness out of the sleeve.


How is this pattern I found on ebay? I was outbid but I would have loved to buy it. The pattern is very much like the one I’m drafting and I would have loved to be able to compare the two (also the dress is pretty cute!) and it’s in my size too! Ah well, the price went too high and I’m saving for a trip to Melbourne at the moment so maybe next time.

Monday, 7 July 2008

PR Pattern Comp - The Jacket Toile

I sewed up and fitted the jacket toile last weekend. My good friend Sarah, an amazing pattern maker, helped me out as I couldn’t exactly reach myself.

The first thing I decided was to forego the shoulder pads. Even though my shoulders are narrow, they are quite square and the shoulder pads made them look a bit knobbly. Here are a couple of pictures of the unfitted toile.

The first obvious problem is at the back waist. The instructions for the block I used said to lower the centre back waist – should not have done that! A quick horizontal tuck from side seam to side seam sorted it out though.
Next it was a bit tight across the top of my shoulder. We opened the seam a little right on the peak (?). I only need to add about 1cm, and I’ll only add it to the front sleeve and taper it off down towards the wrist. This should help the seam to run in a better place down the top of my arm.

Under the arm was pretty good. I’ll take a bit of the body gusset and add it to the sleeve gusset to make the seam hit a better place (you can just feel where it should sit on your body). While I’m at it I’ll slightly adjust the princess seam on the front to be a bit more pleasing.

The only slightly puzzling problem is a bit of ‘puffiness’ in the front underarm region, and the same thing but a bit less of it on the back. I’m not exactly sure what to do here but we’ve drawn in what needs to be removed and I’ll have a look at it when it’s flat. Sarah suggested, and I tend to agree, that I just need to lower the angle of the sleeve relative to the body. This will get rid of the fullness and the gusset has worked well enough that I shouldn’t lose too much mobility – it’s not as if I go around sticking my arms out that often anyway! Also, the front and back sleeve are not at exactly the same angle - I'm not quite sure how that happened! I'll correct that while I'm at it too.

Before altering the collar looks a bit flat and floppy... After re- pinning the front pleat and pinching out some of the fullness on the outer edge I think it's quite acceptable.
I was really hoping not to have to do another toile, but the suiting I am using is sold out so if I mess up I can’t get any more. On the other hand, time is short so I’ll have to consider my options carefully. I know the skirt will be fine so now I’m just itching to get on with it!

I won - sort of

Last Friday night was my work’s mid-year function – a masquerade ball. I didn’t go but I loaned a couple of my costumes to a guy I work with and his girlfriend. Tarryn wore my Victorian lady’s outfit, which was my second year project at WAAPA, and Brett wore my Victorian man’s outfit, my third year project. I’ve never posted these before, as I completed them way before I started blogging and they’ve been under my bed ever since, but it was so nice to see them get some use that I thought I may as well show you all.

The lady’s outfit consists of a corset with hand and machine embroidery on the stomacher, a ruffled bustle, a petticoat with pleated furbelow (the pleated trim around the bottom). The skirt has a piped, scalloped edge and a separate swag with fabric roses and the jacket has bias cut insets, button and loop closure, a mandarin collar and leg-o-mutton sleeves. Tarryn provided her own wig.

The man’s outfit is corduroy tapered pants with a button fly, a crazy patchwork waistcoat (made from scraps of my own clothes!) with welt pockets, and a wool-blend frock coat underlined in calico and tailors canvas. Brett provided his own top hat and boots.

I’m pretty proud of both of these projects and, as a bonus, Brett won best dressed male! He won a bottle of wine which was promptly stolen but c’est la vie!
Here's a couple of clearer pictures taken in the studio at WAAPA and at my graduation parade respectively.

Thursday, 3 July 2008

Finally - a Pattern for the Jacket

Hi all.

First let me apologise for my long absence. My work has been extremely busy in the past couple of weeks due to the explosion in our North West which has cut power supplies to the whole state by 30%. The Department I work for is not an essential service but will be affected by the gas shortage (as will just about every industry – some worse than others). Anyway, I’ve been working my butt off trying to monitor the situation and have been basically exhausted. It’s going to be several months before it’s fixed but at least the work I need to do is set up now so I can take a short breath!

I have managed to make my jacket pattern for the My Pattern comp. I’d like to give a big thank you to all the people out there who so generously share their expertise and I’ll tell you why. I had a plan for this jacket – a pretty solid plan. Then I received a comment from Petro on my WIP review asking if I was planning to use a kimono block with a high underarm and cut on gusset.

Now the only kimono blocks I had seen until then were they ones like in Winnifred Aldrich’s book – literally an easy fitting all-in-one sleeve. This look is not good for me, given I have a very short area between my underarm and my waist – trust me I’ve tried. However, something stuck with me about the comment and one day, I stumbled across Natalie Bray’s book More Dress Pattern Designing. I’d seen the book before but it was quite expensive so I hadn’t bought it. So I opened up the book to a random page and lo and behold – the perfect pattern exactly as Petro had described it. Needless to say I promptly bought the book and have been studying it ever since. So a big thank you to Petro and all the others out there who take the time to share their knowledge.

I started with the block I had already made and converted it to an all in one sleeve with an underarm panel and side seam. I’d love nothing more than to tell you how I did it but about half way in it didn’t look anything like the example so I just ‘made it work’. Here's the first stage of the kimono block - things were going quite well at this point.

The finished back, front and side panels

Front bands, including the right front band that'll have a pleat in it.

The upper collar piece with the pleat set in. And (below that) the upper and under collars.

I’ve cut the toile but haven’t sewn it yet. I feel confident it will either be a perfect fit or a complete disaster – there doesn’t ever seem to be a middle ground with my patterns!

I really hope to get to it this weekend, I get a bit funny when I don’t sew regularly.

Bye for now and I hope it won’t be too long before I next have something to say.