Friday, 27 August 2010

Corset classes 1 and 2

Today I'll show you what I have been working on in my corset making class.


I have a little corset making experience, having made a Victorian style corset as a class project at WAAPA. I have also made a fair few structured bodices using various methods of boning, but I am by no means an expert so I was thrilled when the opportunity arose to develop my skills further. I signed up for a 6-week course, one evening a week at a local technical college.

At first I wasn't sure how I would like it, many of the other students seemed quite inexperienced but I really had nothing to worry about as the teacher is very experienced and generous with her knowledge (not all teachers are like that unfortunately). There will be a class project for those who want to work along step-by-step or we can do our own thing. I have chosen to use a different design but using the same techniques as the class project, my design is slightly more complicated as I wanted to work with gussets. The other techniques I haven't tried before but will be incorporating into my corset are cording, flossing and hand-worked eyelets.

By way of background here is the corset I made while at WAAPA.
(obviously dummies can't 'suck in' - mind you it doesn't fit me either these days!)
It is a pretty simple shape and I added decoration to the centre front panel by winding silk ribbon on to the bobbin and stitching the diamond grid (from the wrong side) with a zig zag stitch.  I then made a hand-worked bullion rose in the centre of each diamond.

Essentially I sewed together the outer shell and the lining individually, placed them wrong sides together and stitched the boning channels on each panel. The only actual seam that is boned is the side seam and that is formed with a flat felled seam. There is a busk in the front, metal eyelets in the back and the top and bottom edges are simply bound with bias strips. It requires a degree of accuracy but isn't complicated.

For this course I will be using a B4254 View D which I have had lying around for years (I was intending to make the Tudor/Elizabethan style corset, but like so many projects it fell by the wayside). I'll also be using the fabric and boning I got for that project. On the upside this will be a very economical project for me!

So far I have made and fitted a toille. Essentially I am making a size 12 with a little room in the hips, a 1cm increase to each side of the gusset/cup (by way of an fba) and nipped in a little at the top edge. Pretty easy really.  Fortunately I kept the practice eyelet strips I made for my other corset and was able to use them for fitting.  This ensures a nice even gap down the centre back.
Next I moved on to sampling some of the techniques.
Here is my first attempt at cording - sorry it's a bit blurry but I think you get the idea. I stitched 3mm channels and threaded through two lengths of machine knitting yarn, probably about 5ply I would say. It needs to be something quite hard - like acrylic but this is a little thin. For my second sample I stuck with 3mm channels and I used some 8ply acrylic leftover from my swiffer socks, again using two lengths. This gives a nice firm result. Boy is it boring sewing all those channels though - no more samples for me I think!
The method of boning I will be using for this project is quite different to any I have used before. The outer and lining fabric are placed together, like underlining, then the seams are stitched. Bias strips are then sewn along the stitching line, the seam allowances are trimmed and the raw edge of the bias is turned in and stitched down to the main body to form the boning channel. The channels can be placed on the inside or the outside of the corset depending on whether or not you want it to be a design feature, but both sides are fully finished and neat looking. Mine will be on the outside. I have made up one half of the corset to test out these techniques (I need to perfect the measurements to cut the bias the right width for my boning).  Note the centre front and centre back panels are not joined on as I have to insert the busk and make the eyelets before those panels are joined on.
This week I think we will be inserting the busks (which I have done before but it will be interesting to see if there is a different way to do it) and making hand-worked eyelets (which is great for me as I hate putting in those silly metal eyelets - all that work to be ruined by one wonky grommet!). After that (possibly this weekend) I will start on the real thing.

This weekend I must get on to blocking my featherweight cardigan.  It's been waiting for over a week now!

Friday, 20 August 2010

Jess's Wedding Dress Part One

I mentioned previously that I am making a wedding dress for my friend Jess at the moment. We had a preliminary try-on this past weekend and I am relieved to say it went very well!


Jess has given her blessing for me to blog about the project. Her family and friends are mostly in the UK and she would love them to be a part of the experience so this is a good way to share the journey with them as well as with my regular readers. So welcome along Jess's friends and family, I hope you like what you see and drop me a line anytime if you have anything you want to share!

First a bit of background. I met Jess a few years ago when she started dating Wade, who my fella and I studied with at WAAPA. Wade is an absolutely top bloke and I am pleased to report that Jess is a perfect match for him. When she rang me to tell me that Wade had proposed I could not have been happier! Then when she asked me to make the dress I didn't hesitate to say yes.

I haven't made any wedding dresses since I stopped working at a bridal design studio about three years ago, mainly because of the stress involved. I have done a couple of private contracts before and my brides have always been lovely, but I did have one very difficult sister-of-the-bride which soured the whole experience for me. That coupled with some of the bride- and maid-zillas I came across at the design studio really put me off, although making wedding dresses generally is still something I very much enjoy. I was happier drafting patterns and making samples for the shop rather than for actual brides. Call me crazy but I am sort-of thinking about going back to it again - the corporate world really doesn't agree with me and I'd love to work from home again!

I know for sure I won't have any problems with Jess. We are able to communicate well and understand each other and Jess is very realistic too. Also it doesn't hurt that she is absolutely gorgeous!

The wedding will be a barefoot affair, on a beach in the beautiful south-west with the reception at Wade's parents' bush block near Dunsborough. It's not until April next year, so I probably won't start the actual dress until November, but we just wanted to get our ideas together to see if we had nailed it yet or need to keep looking.

We have been snoop-shopping a couple of times (with one of Jess's bridesmaids) and Jess has tried on dresses that are both very high-end and off-the-rack. We were conscious of not wasting too much of people's time, and it was never the intention to knock-off someone else's hard work but it was important that Jess be able to see how she looked in a variety of shapes and styles before committing. That's the problem with custom-made, it's hard to know what you like and don't like until you actually put it on. There were some that looked good and some that looked great - lucky Jess has the sort of figure that doesn't look bad in anything - and I was able to get a feel for what she was looking for. The key points were:

• A sheer layer over satin
• A dramatic back
• Not too low cut in the front
• Some kind of draping to give movement

I decided to go with a fitted and lightly boned bodice with chiffon draped free-form over the top. I had a photographic reference of a dress with wide chiffon straps and a tied bow at the back so I incorporated those too.

This is what I mocked up with some poplin and polyester chiffon. You will need to use your powers of visualisation as it's very rough!


For the under bodice I used a pattern I drafted ages ago but never used, and I used my trusty Vogue 8494 as a guide for the skirt.

The good news is that Jess loves it! It was a little big so I have fitted the bodice to her which, having many vertical seams, is easy to do. I will also lower the back substantially, it can go a lot lower and still be appropriate and the romantic style of the straps will make sure it doesn't get trashy. Generally though it has turned out a winner, which is great because I am very happy with it too!

I will put up a post on the bodice soon, to show how the under layer works and in the next few weeks we are hoping to go fabric shopping. We are thinking a silk satin with a bit of body, but not stiff, for the under layer, with silk chiffon over the top. We will most likely go for ivory although Jess is open to other colours, but given it's an outdoor event we will probably stay away from the whiter end of things.

I also have two weeks of corset class to catch you up on and I have finally finished the Featherweight Cardigan (although I haven't blocked it yet!).

Tuesday, 10 August 2010

M5929 - Version three

As I mentioned previously I will eventually have four versions of this shirt.  This is version three.  I have previously in a floral with the ruffle, and the long sleeved version without the ruffle.  This version also skips the ruffle and has a different sleeve.

I was inspired by this image from the August 2010 Madison magazine.  You can barely see it but this shirt is by Boss Black and it retails for $329 Australian.  I reckon my version came in under $25 so you have to be happy with that!

Here is the front view.  I like the open neck a lot better than the traditional shirt neckline on me.  I find there is too much fabric in the upper chest and it never lies flat.  The stripe with white collar and cuffs reminds me of rich bankers (I said bankers).

Either side of the front band I added a 1cm strip of striped fabric cut on the bias.  I love how this turned out!  The only tricky bit is that you need to cut your bias bands perpendicular (at right angles) to each other not parallel (alongside), or you won't be able have both sets of stripes running up (or down).  Ask me how I know.  Fortunately my fabric was kinda reversible so I think I got away with it.


What I didn't get away with was working all the buttonholes on the wrong side - dammit!  I checked  twice and STILL did it wrong!  Now I can't wear this shirt with pants (I like everything to overlap the same way - call me crazy).  I can however wear it with skirts, and jeans if I was the type to wear a shirt like this with jeans!

I morphed the sleeve into an oop vogue sleeve with a traditional placket and french cuff.  I cut down the cuff so it doesn't fold back though.  I made the cuff links from a pair of shank buttons.  The purple dot is my disappearing marker that hasn't quite disappeared yet (it will).

I did a pretty good job on the cuffs if I do say so.  I used the David Coffin DVD for the first time and they came out great.

I also think the collar looks pretty good - collars with a stand are always a challenge for me.  Again I used the David Coffin DVD and am much happier than normal.
Just to round things out, here's the back.
You know I am thinking I am going to have to re-visit some of my fitting alterations.  I am just not getting the nice smooth finish I used to.  Any suggestions (other than 'get to the gym')?

So I have one more version of this shirt planned but I am going put it on hold to work on a coat and a jacket before the cold weather is gone for the year.  I am also starting a corset making class this week (I have done some corset making before but this is apparently a 'master class' so I will let you know how it goes) and I will be working on a toille for my friend Jess's wedding dress - which you will be pleased to know she is happy for me to blog about.  Not likely I'll be bored any time soon!

Wednesday, 4 August 2010

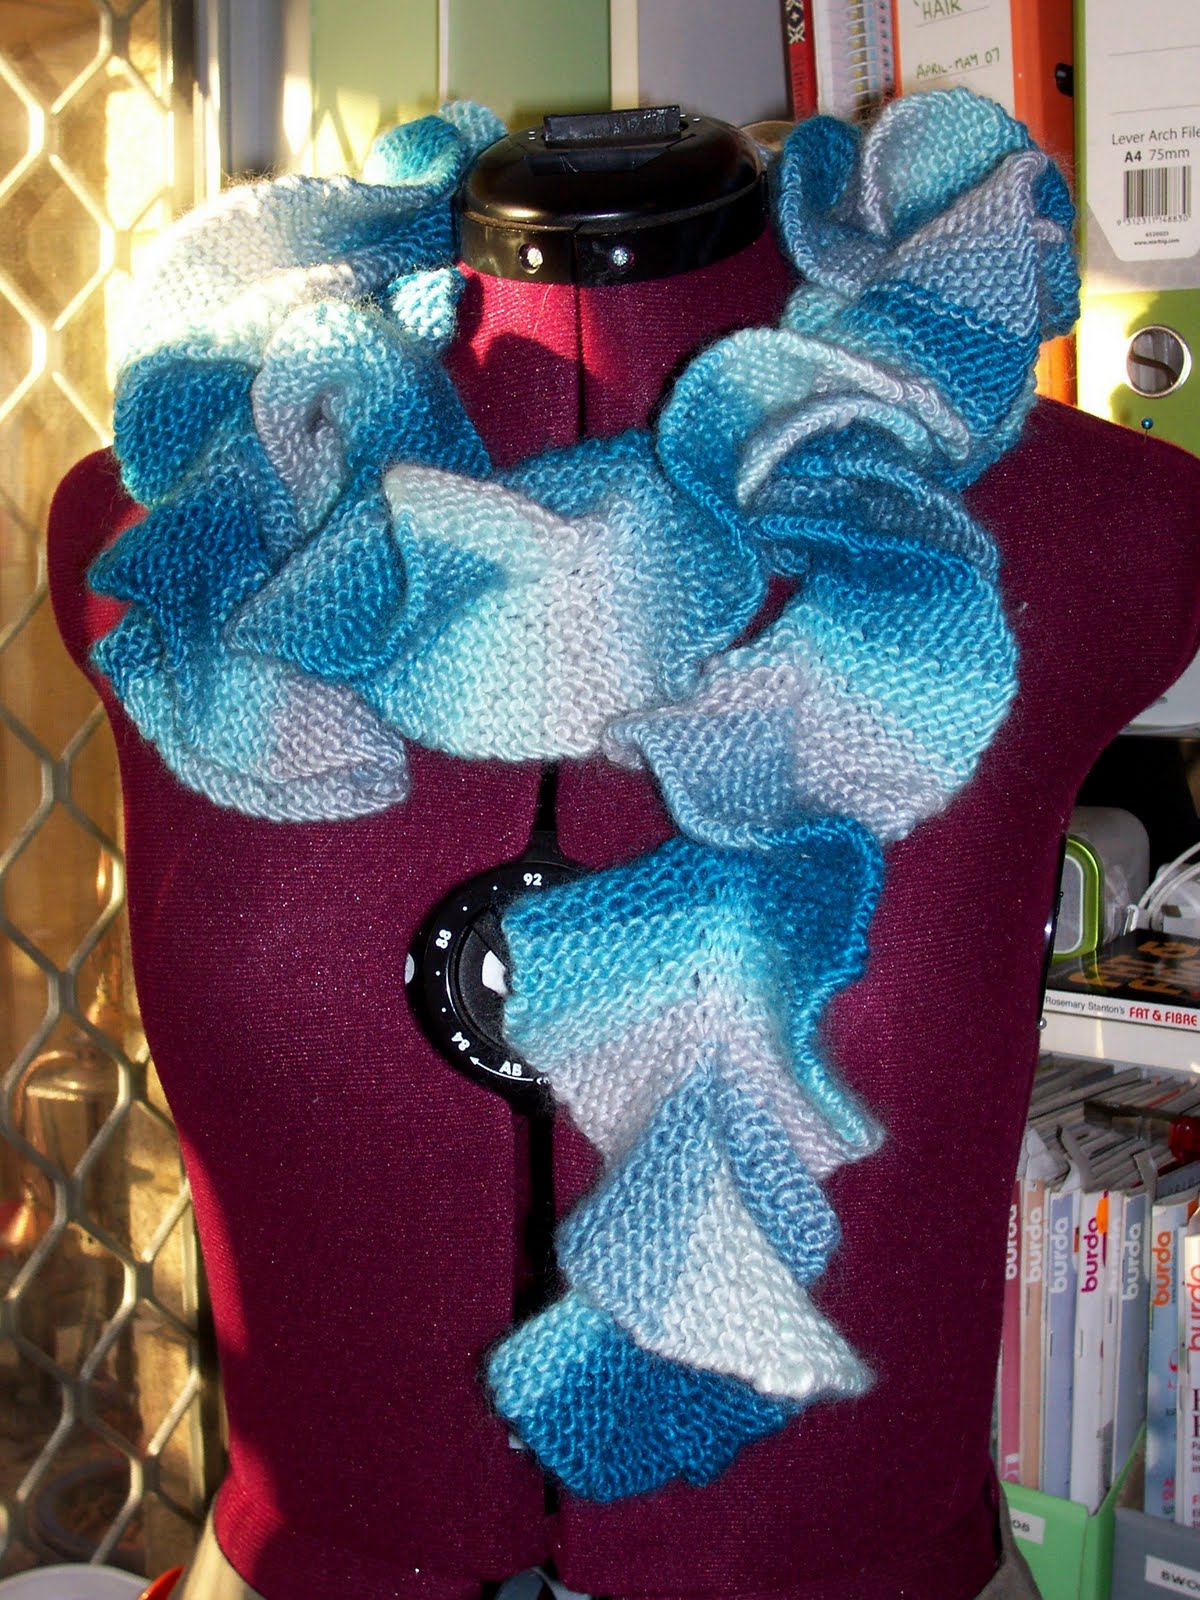
Spiral scarf - another knitting project

Today I am 'sick as a dog'!  It's just a head cold but it has knocked me flat on my back.  Unfortunately it decided to hit me right before I had to give a pretty important presentation yesterday - it was not my finest performance I'm afraid!

So I am home sick today and maybe tomorrow too if I don't improve significantly.  As vital as I am to the running of the State Government  (joke) I like my co-workers too much to share my germs with them.  It's opening night for my fella's first production in his new job tomorrow night so I hope I am well enough to go and support him.

But this is not a health blog, it's a sewing blog - although there has been a lot of knitting/crochet going on around here.  Of course that's mainly due to the fact I could not access my sewing room and/or most of my stash for the best part of three months after the house flooded.  Mercifully that's all fixed now but here's another knitting project if you can stand it.

I bought this pattern and yarn as a kit at the Craft and Quilt Fair, which I went to on my birthday this year. 
I have to say it was a bit disappointing this year and this was all I bought.  I started it the same day so therefore it has taken me more than two months to knit this in around other projects.  The pattern is the Spiral Scarf and the yarn is Quartet, both by Morris and Sons.

The ruffles are formed entirely by short rows, essentially the scarf is formed of many, many little wedges.  The yarn has soy in it and feels lovely and soft but the twist is a bit irregular with some very thick bits and very thin bits amongst a mainly even yarn  It's fine as long as you don't mind a few lumps.

It was an easy knit but boring, due to it being essentially garter stitch with 8ply yarn on 4.5mm needles.

I like how it came out and I got some compliments when I wore it to work the other day.  A success all around and another completed project to add to the tally.

Saturday, 31 July 2010

M5929 - Take two

Apologies for cross posting here and at pattern review, I can be bothered writing the same thing in two different ways today!

This review is for McCall's 5929.

Pattern Description:
Fitted shirts A, B have darted front and back, front band, front ruffles and shaped hemline; shirt A has stand-up collar, below elbow length sleeves with sleeve band; shirt B has collar and collar band, full length sleeves with placket opening and cuffs; dresses A, B have sleeves gathered at cap and lower edge.

I made view B with the full collar and long sleeves but left off the ruffle.

Pattern Sizing:
I cut a 12 to the bottom of the armholes then graded to a 14 at the waist and hips.

Did it look like the photo/drawing on the pattern envelope once you were done sewing with it?
Yes.

Were the instructions easy to follow?
I made this shirt last year for the PR wardrobe compettion without any problems. The review is here or you can see it here as well.

What did you particularly like or dislike about the pattern?
It might not seem like it but this is a very versatile pattern. This is the second time I've made it and it looks quite different. I have two more versions in the works as well. I am not usually one to use TNT patterns!

Fabric Used:
Stretch poly-cotton shirting. It was a bit of a bear to get the front bands on nicely since I cut them so the stretch ran lengthwise, but other than that it behaved quite nicely.

Pattern alterations or any design changes you made:
I altered for my short and narrow upper back and I probably should have made the cuffs a bit snugger (but didn't). I didn't need an fba so if you are petite in the bust (I am a C-D cup) you might want to look at the sizing in the front. On the other hand I don't like a lot of ease anyway so maybe it will be fine.

Would you sew it again? Would you recommend it to others?
Yes I will sew it again at least twice and yes I would definitely recommend it to others.

Conclusion:
It's boring basic shirt for work but everyone needs boring basics too.

Sunday, 25 July 2010

Friday Night Sew In Results - July

I didn't get as much done as I would have liked on Friday night but any extra sewing time is a bonus right?

I got the body of this blouse together last weekend but have been caught up sewing for my fella's next production for most of the week - a curtain 9 metres across by 6 metres long.  I am sure you can guess just how much fun that has been!  So anyway, I was determined to finish the blouse on Friday night.

I sewed the hem and buttonholes in the body then constructed the sleeves.  At this point my sewing machine cracked the sh*ts and refused to work anymore so I has to content myself with spending the rest of the evening sewing on the buttons.  So that's the end of my Friday night - sleeves pinned in and no buttonholes on the cuffs - so near but so far!


****Note, I did manage to limp my machine along enough to finish the blouse on Saturday morning - I'll post a review as soon as I get some photos.

Thursday, 15 July 2010

The Baby Starghan

This is my only my third ever baby blanket - the first I posted here but I forgot to photograph the second before I gave it to my step-brother.  I don't know why I never made baby blankets before, the relatively thick yarn makes them quick to work and once the pattern is established they make perfect mindless TV watching projects  but they are still small enough not to get too boring.  This was my World Cup watching project.

The pattern is the baby starghan by yarndeevah, which I accessed via ravelry.  I used three balls of Patons Big Baby 8ply, which was on special at Spotlight.  Ordinarily I wouldn't use synthetic yarns (it's mainly acrylic) but it's nice and soft and will be very hard wearing.

There is not much to say other than I worked 2 round of each colour until I ran out of yarn then used the leftover cream to work a round of dc (sc in US terms) and then a round of crab stitch (reverse sc) to finish it off.  This was a very easy pattern and very effective.  The recipient absolutely loved it (she is having a little boy).  If I ever get the chance I'll make one for myself.

On another topic, we finally got our bookcases replaced this week, three and a half months after the flood so we're now pretty much back to where we were before.  I am so happy!  We spent most of last weekend putting things away which meant I could clear all the boxes out of the sewing room - I can't wait to get in there and sew in comfort again!  And just in time for the Friday Night Sew-In next week.

Saturday, 10 July 2010

Short rows explained

A couple of you have asked how I worked the short rows on the back of the dressage jacket.  It was my first time trying this so I pretty much fudged it, but I'll do my best to describe the process.  I admit the maths did give me a slight headache at the time but it wasn't really that hard, I just really over-think things!

The idea is that I have a sort of sway back, but above my waist not below it.  I usually tuck out between 1 and 2 inches on the centre back seam of my sewing projects so I wanted to get the same effect on the back of the cardigan.

First I figured out how many rows less I wanted in the middle of the back (it's sort of the opposite of normal short rows, where you are adding more eg. at the bust).  In this case it was only 6 rows (about an inch), when you do your calculation you will want this to be an even number, let's call it a (can you tell I work with statistics?). 

Each short row you work is actually a pair of rows (there and back) so you need to divide a by 2 to work out how many pairs of short rows to work, in my example this works out to be 3, we'll call it b.

Now, take the number of stitches in half the back (for example, full back=80 stitches therefore half back=40 stitches), continuing the theme we'll call it c.

Divide c by b+1 (example 40/(3+1)=10 stitches).  This is how long each of your short rows will be, from now on referred to as d.  The turns will be evenly spaced either side with a wider straight section in the middle.

Now, knit to the waistline and work the following (my example in brackets):
Short row pair 1: work d (10)stitches, turn and work back (or wrap and turn if that's your thing - it is mine).
Short row pair 2: work d*2 (20) stitches, turn and work back.
Short row pair 2: work d*3 (30) stitches, turn and work back.
Repeat until you have completed the required number of short row pairs (b).
Now work across the whole row and repeat the exact same short row process on the other side of the piece.

Here is my craptastic PowerPoint representation of how it looks so you can visualise the process.

Then finish the back as instructed.   Make sure when you measure the length of the back that you measure at the side seam rather than the centre back - otherwise your back will come out longer than your front!

The centre back of the cardigan will scoop upwards when it's laid flat but looks straight across when it's on the body. 

Of course this is easy on a simple pattern like stocking stitch or rib, but I I have a lace project in the queue and I am not sure if I'll be able to figure that one out!

I hope this helps, I really am not a knitwear designer so if I can do it anyone can! Good luck.

Thursday, 8 July 2010

The Dressage Jacket - finished

Last Sunday I went to see Eclipse with my friend and regular movie-buddy Kate. I thoroughly enjoyed it. I am not a Twi-hard by any stretch and I don't particularly relate to any of the characters, but if you made me choose I would have to go for Edward (I can't resist a man with sideboards - lucky for me my fella wears them!). I have always loved vampire stories starting in my teens with the original novel Dracula, moving on through the Anne Rice vampire chronicles and I am currently reading the Vampire Academy Novels - so vampire movies are always on my 'to see' list. Plus I love the clothes they put Alice in,! Isn't this coat/smock from New Moon cute?

Image from here.

But the point of this post is not a movie review but a cardigan review. Yes, that's right the Dressage Jacket is finished and has had it's first public wearing.

The yarn:
Sublime aran by Sirdar. The colour is 'wicker'. This yarn feels beautiful to knit with, very smooth and soft, and no splitting. However, there is something you should know. When I blocked the pieces (soaked them in tepid water with wool mix, gently lifted them out and rolled in a towel then patted to shape) they GREW. A lot. The technical diagram for the cardigan shows a finished length of 49cm, I admit I didn't measure before blocking so it may have started out a bit longer than this but after blocking it is now 69cm! it also grew in width but it's hard to measure with the rib. Let's just say before blocking I was thinking it might be a bit tight and now I certainly don't have that concern. If I were to do this over I would knit a reasonable sized swatch, measure it, block it and then measure again. You might find you can go down a size.

I also ran out of wool which was frustrating. Fortunately the yarn shop I bought it from still had some of the same dyelot in stock so it all turned out well, but it is really expensive yarn so I did feel a bit ripped off! For the record I have never run out of wool before, I usually have a good amount left over so if you are a tight knitter you may want to consider having an extra ball as backup.

The pattern:
Dressage from the Third Sublime Aran pattern book. I knitted the smallest size and find it a little big. For reference, my high bust measures 87cm and my full bust measures 91cm. I chose the 84cm size because I prefer my tops to be fitted fairly close. Winters are mild here and I usually only wear a long sleeved t-shirt underneath at most, so I don't need to allow room for bulky under layers. The size is comfortable it is just a little less closely fitted than I would like, but it's just as well because with the extra length I need extra room to go around my hips! The sleeves are quite long, they come down over the back of my hands and aren't snug enough to push up, but I can live with that.  Look at the fit on the model and compare to how it fits me.  You can bet she doesn't have a 91cm bust and it looks tiny on her!


Image from here.

On the back I made an alteration for my short upper back by working short rows just above the waist. I've never done this before and it worked pretty well, at least I don't have a huge fold of jumper in my lower back as I usually do!

I closed it with a shawl stick (which I also bought at the yarn shop), but I think it also looks nice hanging open. Since it's bigger than planned the fronts wrap right across to the opposite side seam so I might sew on ribbons to tie it closed. Long term I think this will cause less damage to the cardigan. I will also stitch some ribbon across the inside of the shoulders and back neck to stabilise them and possibly snug them up a bit.

Conclusion:
I am very pleased with this, I used high quality yarn (a real splurge) but it was worth it. The design is modern and smart but also comfy casual at the same time. I did read somewhere that this yarn pilled with only light wearing but fortunately I have not noticed that yet, and I will be very p***ed off if my $180 cardigan doesn't wear well. Some care will be needed when washing it, lest it stretch even more. All in all though I can see myself wearing this a lot in winters to come.

Thursday, 1 July 2010

Pattern Review - M5927 the frankendress

Here is the third and final installment of 'what I finished on the Friday Night Sew-In.  I am calling this the frankendress because it is the bodice of one pattern (M5927) attached to the skirt of another (Vogue 8494, which I used to make my Christmas dress last year).

The fabric is the same stretch suiting as I used for the black a-line skirt and grey pencil skirt.

I didn't need to make an fba as the pattern has different front patterns for different cup sizes.  I love it how pattern companies are doing that these days, it makes one less alteration I have to make!

Here's the back.  I made my normal short and narrow back alterations.  I'm not sure what's going on with those wrinkles in the lower back.  It could be the way I'm standing as I've never noticed them before.  Or, I've just thought it could also be the weight of the skirt as the fabric has a two-way stretch.  I stabilised the waist of the skirt with twill tape but maybe I need to add a stay?

Anyway the fit is pretty good if I may say.
Here is a close up of the bodice.  Now I am pretty sure that wrinkle is a posture thing.  It was really cold and I think I am hunching my shoulders a bit.
I'm not sure if you can see the detail of the pretty design on the mother-of-pearl buttons.  I originally bought them for a jacket but then I ended up using the jacket fabric for a skirt and these poor beauties have been homeless ever since.  It's nice to finally use them.

You'll be able to get to the full review from my widget if you are interested in the gory details.

Sunday, 27 June 2010

Pattern Review - Burda Style 03-2010-106

Here is the second of the three garments I finished on the Friday Night Sew-In, a pencil skirt with welt pockets.  The pattern is number 106 from the March Burdastyle (sorry I cannot be bothered looking online for the technical diagram - please sort out the archives Burdastyle!), the same issue I used for the black a-line skirt.  That makes this issue a bit of a winner in my book, while I might love a number of patterns in any given issue I rarely get around to actually making two!
I must apologise for the dim photos, it is hard to catch the sun at the moment!

Behind me you can see the future site of my backyard veggie garden - I just have to figure out how to get the soil into it when the only access to the courtyard is through the house, hmmm probably should have though of that before!

Anyway, back to the skirt.  It's your run-of-the-mill pencil skirt but with welt pockets front and back.  These were tricky on the stretch woven fabric, but they came out passable.
I'll have to sew the back pockets closed - not that I would ever use them anyway!  My primary sewing machine has been in for a service and I couldn't be bothered getting another one out, I promise I'll do it before I wear the skirt to work.

Please just look at the skirt and not my ratty courtyard!

As for my previous skirt I cut a 42 at the waist and a 44 at the hip and the fit came out great.  For once I didn't lengthen the pattern as this design is longer than the standard Burda skirt.  It's a smidge shorter than I would normally make but I think it's fine. 

Instead of making the front fly (which always looks a bit wrong when I sit down), I put an invisible zip in the centre back.  I also added a kick pleat so I can actually walk in it.  I took photos of my lovely kick pleat and mitred hem but dark grey doesn't photograph well on a winter's day so you'll just have to trust me that they look really neat!

There is not much sewing going on here atm.  My sewing room is not heated and it is COLD in there!  Instead I have finished knitting the dressage jacket (blocking it today) and am working on a crocheted baby blanket as a gift for a woman at work.

Tuesday, 22 June 2010

Pattern Review - Burda Style 03-2010-105

Here is the first of the three garments I finished up in last week's Friday Night Sew-In.  It is not very exciting, a black a-line skirt, but I have to say I am very happy with it.  The shape is really nice,  not too triangle-y and it is seriously easy to put together.

(I wouldn't normally wear all black like this but I just slipped the skirt on with the blouse I wore to work today!).

I cut size 42 at the waist blending to 44 at the hip.  The only changes I made were to lengthen the skirt to 65cm so it finishes just below my knee, added a lining and moved the zip from the side seam to the centre back.  My hip curve is quite extreme so zips never sit right in the side seam.

I think I've found my new TNT a-line pattern!

Saturday, 19 June 2010

Friday Night Sew In Results

My Friday night sew-in started slower than planned.  I got kept late at work and having had a trying day I had to unwind a bit before I could start sewing.  Fortunately the April BWOF (or whatever) arrived in my letterbox so I was able to wind down with a nice (sewing related) read.  Ever since I saw Eugenia's version of this skirt I have been saving a piece of black fabric so now I have the pattern in my hot little hands then guess what will be coming soon?

I had every intention to start and finish a project but instead I finished off three jobs I've had on the go for the past few weeks.  Full reviews and a proper photo shoot will be upcoming but it's been a grey old day today, I've been to see Prince of Persia with my friend Kate and I am quickly posting this before dinner and then the Australia v Ghana game.

So photos on Dion will have to suffice, bearing in mind that s/he is a little less well padded than me so in reality the curves will be better filled out.  BTW, Dion is my dummy.  The brand name is Diane and I was given him/her as a gift by my former co-workers.  When they handed him/her over one of my workmates said 'now I know this is something you've wanted for a long time...' and another one piped up 'It's a husband!'.  We all laughed and since then my dummy has had a male name.  That was seven years ago and I am still not married but Dion and I have had some good times!

So enough of the ramblings you say, what are these projects you finished?  Well, it was two skirts and a frankendress.  I have been making them on a production line as I thought I'd get done quicker but I am not sure that's true.  Last night I set in all the linings and did the hand finishing.

Skirt #1 is a basic black a-line.  Not much to say here, it's just a basic black skirt, but it is something my wardrobe has been lacking for some time.

Skirt #2 is a grey pencil skirt with welt pockets front and back.  This one needs a tummy and a butt to fill it out.  Luckily I have those, unlike Dion!


I think I'll sew these back pockets shut!

Finally the frankendress is the bodice from one pattern and the skirt from another.  I worry it looks a little prim but if I can find the right belt I reckon it'll be fine (hmm shall I prune the roses or shop for a belt tomorrow?)

So there is my night's efforts.  I am quite proud of myself for finishing all these things off, I'll try to get full posts on each of the garments done this week.

Tonight I am hoping to finish the first sleeve of my dressage jacket.  I love knitting while the football is on - I don't really need to look at what I am doing and when I get excited I go really fast!

Friday, 11 June 2010

Housekeeping

Thanks everyone for your lovely compliments on my houndstooth coat. I am really pleased with how it turned out.

Also, thanks very much for your helpful feedback on the rose tunic. I agree it is completely the wrong length, and I would make this pattern again in the shorter length, but I wanted a longer top for those 'can't be bothered' days. Fortunately, as suggested by Gail, wearing it with sleek black pants and high heels helps a lot and it looks quite presentable. I can live with it anyway!


I have been doing a bit of production line sewing so I have a number of garments in the making but nothing finished to show. This kind of sewing really is more efficient but it does take a lot of the fun out of it. But I NEED new clothes! I hope to finish two skirts and a dress on the weekend.

For the past few months I've been wanting to join in with the Friday Night Sew-In but every time it comes up there is somewhere else I have to be. Not this month, so I've signed up. It is on Friday the 18th of June and I have already told my fella I have a date with the sewing machine that night. Now I just have to think up a project to work on.

Finally, the World Cup starts this weekend and I can't wait. Unfortunately the time difference means that all the live games will be on at 9.30pm (not too bad) or 2am (terrible), but the good news is we have Foxtel IQ so we can tape the games and watch them at our leisure. The only problem being having to avoid EVERYONE at work the next day so they don't spoil the result! I dare say there will be a few bleary eyes at my work over the next month. I love football, but not enough to miss precious sleep! GO SOCCEROOS!Especially Lucas Neill.
http://theworldgame.sbs.com.au/socceroos/news/1007499/Neill-out-to-make-amends

Saturday, 5 June 2010

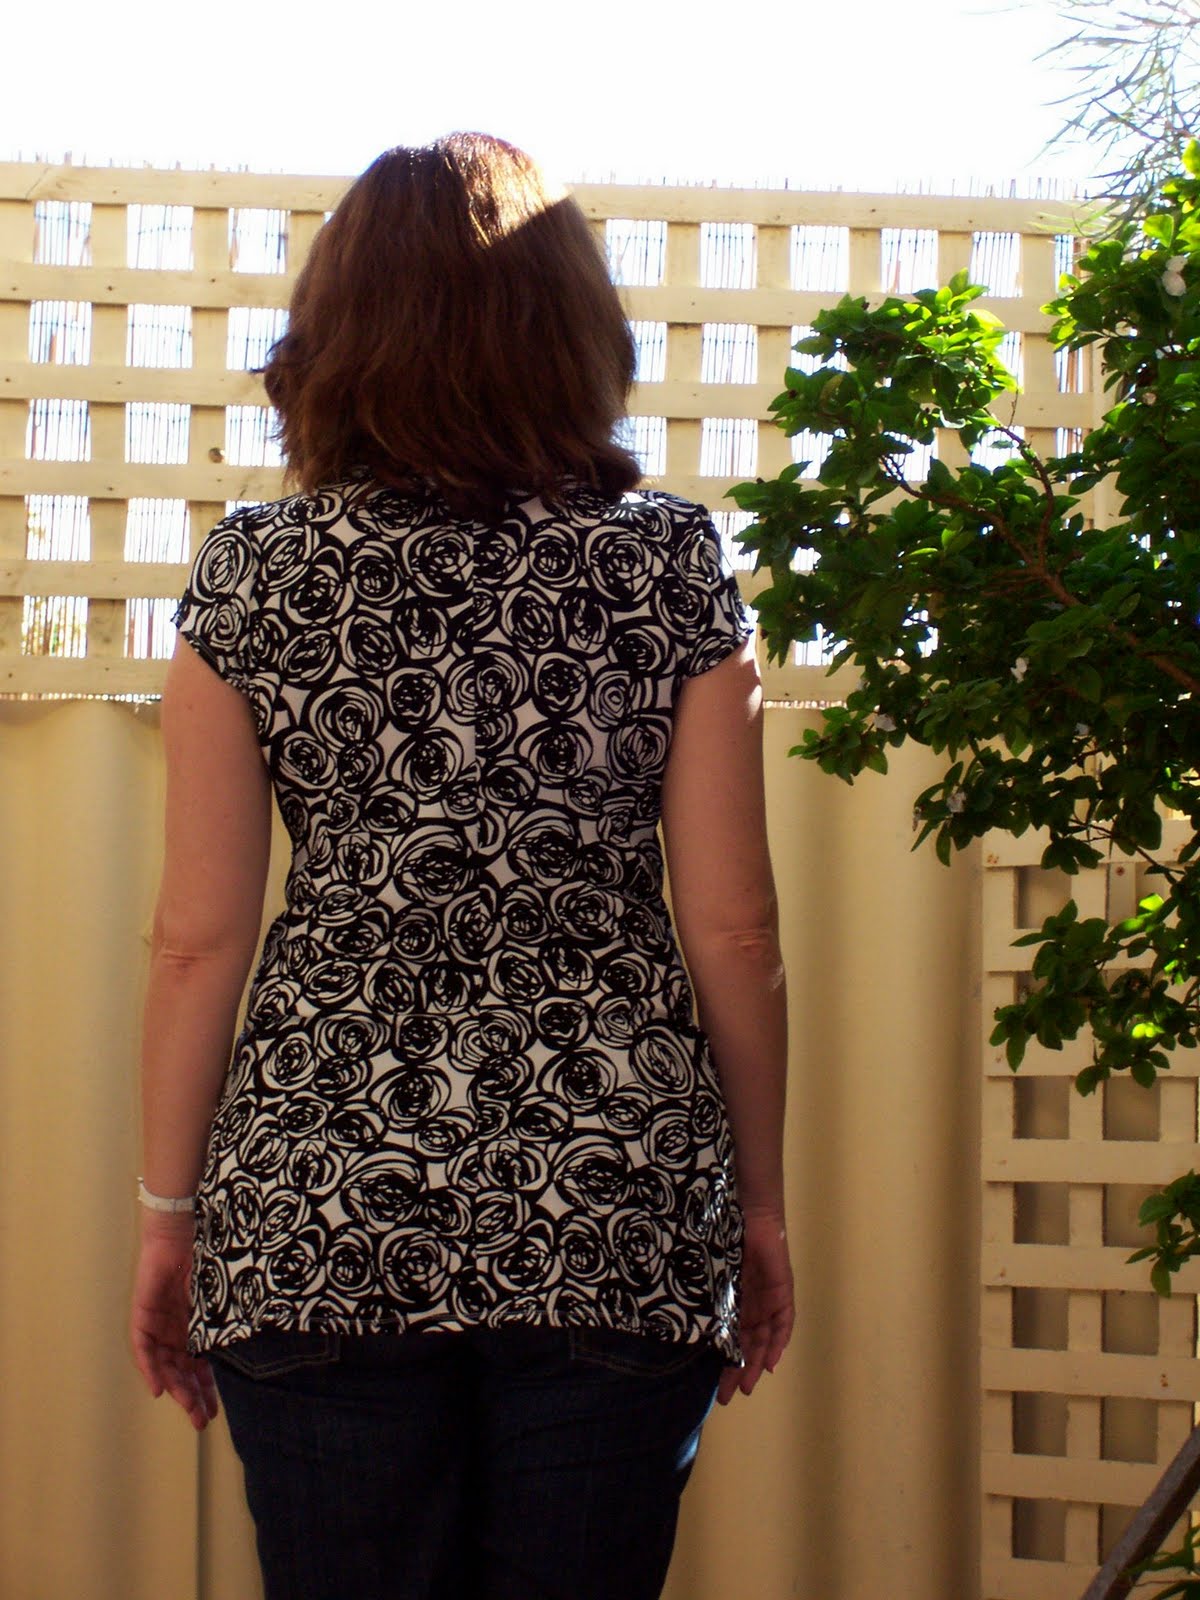
McCall's 6120 - Rose print tunic

This is one of the other projects I finished while on holidays.  It's okay but I am not wild about it.  The pattern is McCall's 6120.


Wow, I look really broad at the beam!  Here's the review.

Pattern Description:
(from the website) Tops A, B, tunics C, D have front pleats, self-faced front midriff and sleeve variations; top A has armhole stitched hems; top B has short sleeves; tunic C has three-quarter length sleeves; tunic D has self-drape and purchased jeweled applique.

I made the tunic length but with cap sleeves.

Pattern Sizing:
I cut a 12 to the bottom of the armholes, grading out to a 14 at the waist and 16 at the hip/

Did it look like the photo/drawing on the pattern envelope once you were done sewing with it?
Yes I guess so.

Were the instructions easy to follow?
The instructions were fine but I don't understand why they have you turn under and hand stitch the lower edge of the midriff facing - in a knit???? I just pulled the facing down so the cut edge matched with the outside midriff piece then caught the two pieces in the seam together.


What did you particularly like or dislike about the pattern?
I admit I don't love this top. There is something not quite right about it. The length was dowdy and even with a good inch taken off the bottom I am still not sure it's flattering. By contrast I made Simplicity 3678 in February 2008, which I have subsequently cut off to tunic length and it works so much better.  I can't find the pattern on the Simplicity website, so maybe it has been discontinued - anyway, it was one of the Threads patterns. I don't know what it is, the two styles are pretty similar, except the lower front of the Simplicity has gathers. If I was to do this again the Threads pattern would win hands-down.

Initially I cut the longer sleeve but it just looked ridiculous on me - like my hands were floating in a ginormous sea of roses. The cap sleeves work much better, I'll just have to layer for winter!

I must say the neckline does sit nice and flat without any fiddling, so that is a plus (I fused bias tape on the inside and stitched with a twin needle.

Fabric Used:
Polyester knit, nothing fancy, I got it cheap from Spotlight.


Pattern Alterations or any design changes you made:
As usual I narrowed the upper back, shortened the back above the waist and widened at the hips. I don't usually need an fba in knits.

Would you sew it again? Would you recommend it to others?
I won't sew it again, I'll use the Simplicity pattern as above. It might work better on a different body type though.

Conclusion:
It's okay, I'll wear it to work and still look presentable, at least it is comfortable!